This is a very special post about a very special event that I was a participant in this weekend. I was lucky enough to have been chosen to take part in this month's Foodbuzz 24, 24, 24 - a food blogging event that takes place every month. Foodbuzz 24, 24, 24 is a great concept - 24 food bloggers from around the world are chosen to each host a unique meal on the same date and blog about it on the same date. I had thought it would be fun to take part in it for a while but couldn't think of a meal concept. Then it came to me - chocolate! I can't believe that one took so long to come up with...
I constructed a 5-course meal, each course including chocolate in some form. It was so much fun to plan and make, and of course, wonderful to eat. The event went incredibly well, despite some hurdles I had to cross. Thankfully, I'm pretty good at taking things as they come...
So, as I mentioned, the meal was yesterday. I had planned on hosting it at my mom's house. She lives in a beautiful house in the woods that was originally built as a church in the late 1800's. Then in the early '80's it was deconstructed and rebuilt in it's current location as a house. It is incredible. It has 17 foot ceilings in the living room, a 2-tiered antique chandelier, a 10 foot tall Gothic window, as well as leaded glass windows, floors and wainscoting that are all original to the church. It was the perfect location to hold a meal about the love - worship in my family - for devout chocolate lovers. However, Mother Nature had other plans.
Friday morning, we woke up to several inches of snow which only increased as the day went on. We were unable to get our car out of our driveway (still can't actually) and we lost power Friday night which we still don't have. How am I writing this post, you may ask? Thankfully, we have friends (who attended the meal, by the way) who's dad owns an apartment in downtown Asheville that he keeps for visiting friends to stay in, and it was empty this weekend, so we've been staying there. Actually, it is so nice, I wouldn't mind if we never got our power back at home!
So, with the car in the driveway, we had no way to get to my mom's to have the meal. We went ahead and did it at our house. This was possible because I had done a lot of prepping in the days leading up to the meal, and we have a gas stove that was unaffected by the power outage. Also, we held it at 2:00PM, so we had the benefit of natural light - or at least as much light as we could get on a cloudy, snowy day. This brings me to an apology.
The photos. The photos, the photos, the photos. I had visions of beautiful photos of my beautifully styled beautiful food. That is not what I got. Despite all of my planning and prepping, there was still a lot of work to be done the day of the meal, not to mention keeping my 1 & 3 year olds out from underfoot. I was a harried frantic mess up until I sat down to eat (when everyone else was on the fourth course). I was making ganache while my guests were eating their main course, and the best I could do was snap a few shots just as I was slinging the food on the plates. So, please forgive me for the un-styled, flashy (as in, taken with flash) shots of my food, which was actually quite beautiful. I'm planning on doing a couple of posts as an amendment to this one focusing more deeply on individual menu items that I will be able to photograph properly, so at least I'll have some redemption...
Now, the chocolate meal course by course:
First Course:
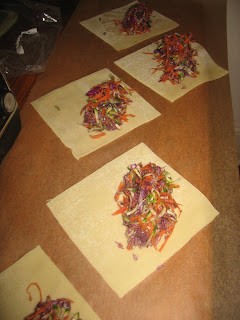
Baby Arugula Salad with Grilled Pears, Cocoa Nibs, Sheep's Milk Feta and a Cocoa Balsamico (Pictured above)
I had hoped to have pomegranate seeds in this salad, as well, but couldn't find one. The salad, though very simple was very delicious. I had also hoped to find mache, but the baby arugula worked beautifully. The Cocoa Balsamico was a huge success, and something that I'll be making again.
Cocoa Balsamico
1 cup balsamic vinegar
2 tablespoons unsweetened cocoa powder
Place vinegar in small saucepan and cook over very low heat until it becomes a thick, though still pourable syrup. Remove from heat and stir in cocoa powder. Use immediately.

Second Course:
Roasted Butternut Squash Soup Topped with Nib-Infused Cream
This soup (minus the nib cream) is a specialty of mine. I make it for holidays and dinner parties on a regular basis, and it is always a crowd pleaser. The Nib-Infused Cream is an idea that came from Bittersweet by Alice Medrich. She is the Queen of Chocolate, after all! The nibs add a great crunch to the soup, and the slightly bitter cream is a wonderful foil for the sweet squash. Definitely a wonderful and simple way to make a dish extra special. I'll make it again soon, photograph it properly and give you the recipe, I promise.

Third Course:
Mole Enchiladas Filled with Roasted Sweet Potatoes, Fingerling Potatoes, Whole Garlic Cloves, Sauteed Lacinato Kale and Monterey Jack Cheese
This was my first time making mole, and I don't think anyone who tasted it will allow it to be my last! It was amazing, heavenly! Just the right amount of spice and heat, great depth of flavor and perfect texture. The recipe makes a lot - a little over a quart - so I need to come up with some ways to use mole over the next week or so. Send your ideas forth! I'm going to photograph the mole and do a proper post on it, but here is the recipe for the enchiladas (which I basically made up as I went along...)
Roasted Vegetable & Sauteed Kale Enchiladas
4 cups of diced potatoes and sweet potatoes, any variety
8-10 cloves of garlic
zest of 1 lemon
1 teaspoon coriander
1 teaspoon sea salt
3 tablespoons olive oil
1 bunch of kale (I prefer lacinato or red russian, but any variety will work. Chard would also be tasty)
olive oil for pan
salt to taste
2 cups grated monterey jack cheese
8 corn tortillas
1 cup mole sauce
Preheat oven to 450. Grease all surfaces of roasting pan. Place all ingredients in pan and toss well, coating all sides of potatoes & sweets. Roast for about 40 minutes, until everything is soft and slightly browned. Check on veggies every 15-20 minutes, turning them over so all sides brown. Remove from oven to cool. Remove stems from kale and chop finely. Heat about a tablespoon of oil in skillet. Add kale and salt. Cook until kale is soft.
To assemble:
Preheat oven to 350. Place about 1/4 cup roasted vegetables down the center of a tortilla, top with thin layer of kale, followed by thin layer. Gently roll tortilla so that sides just overlap, and place seam-side down in large rectangular baking dish. Continue with this process until pan is full. Spoon mole over tops of enchiladas, followed by the remainder of the cheese. Bake for about 20 minutes.

Fourth Course:
Chocolate & Cheese Plate
The three chocolates I chose for this plate were a white chocolate bar with nibs that I really love by chocolatier Askinosie, which I paired with a subtle, creamy manchego; a 65% milk chocolate that went with a local brie; an 80% dark single origin that was lovely with a pungent bleu cheese. I served the plate with two locally-made flatbreads as well as my chocolate lavash. I highly recommend doing this for your next gathering. Everyone loved all of the selections, as well as the experience of eating it.

Fifth Course:
Chocolate Caramel Tart and Cocoa Nib Ice Gelato
A few months ago, we made this beauty for Tuesdays with Dorie. It was probably my favorite TWD recipe to date, so I immediately thought of it when deciding on my dessert for this little fete. Then I thought of a similar tart from Saveur that I had wanted to make. I went with the Saveur version, because it had a chocolate crust, I was curious about the addition of creme fraiche in the caramel recipe, and because it got rave reviews. Unfortunately, the tart was my least favorite part of the meal. It wasn't bad, it just didn't wow me as much as I had wanted it to. There wasn't a high enough chocolate to caramel ratio, and the caramel itself was inferior to Dorie's. Also, the chocolate crust didn't add anything for me. I missed the shortbread-like crust that Dorie uses - the flavor is better, and I think it allows the ganache topping to shine, as then it is the only chocolate in the tart. Don't get me wrong, this one was good. Really, really good. It's just that I know there is something better out there, and will stick with that one from now on. Once again, the moral of the story is always, always, always trust Dorie.
Now the gelato is another story. Wow. I mean wow. This is ice cream that I would eat any time, anywhere, with anything. It is that good. The recipe calls for straining the nibs from the custard base, but really, why? I love nibs. I think they added a huge dimension to this ice cream. Leave in the nibs! The thing that is most amazing about this frozen delight is that it us flavored entirely with the nibs. It is incredible to eat ice cream that is so light in color, yet so deeply chocolate in taste. What I have left of this ice cream is buried in the foot of snow on my deck, but if it survives, I will take a proper photograph of it and devote an entire post to it. It deserves it. Until then, here is a link to the recipe.

I also made Chocolate Mendiants (disks of tempered chocolate topped with dried fruit, candied citrus peel and nuts) which I gave out in little bags as party favors. The mendiants are one of the items that I'll do a separate post on in the coming days. They were beautiful, fun, delicious and easy, and they make great gifts. I didn't get a chance to photograph them before having to escape my cold, dark house, but the post will be coming soon. I promise.
Thanks so much to Foodbuzz for selecting me as one of their December participants! This was such a fun event to be a part of, my mind is churning with ideas to propose for the next one!