Showing posts with label food gifts. Show all posts

Saturday, March 27, 2010

Homemade Vanilla Extract


Vanilla extract is one of those things that never occured to me to make at home. Then around the holidays last year, posts started cropping up all over the food blog world, and I had to give it a try. It makes so much sense. I buy strictly organic, fair trade vanilla extract and it isn't cheap; upwards of $11 for a 2oz bottle. For just a few dollars more, I made 1 1/2 pints of my own!


The one drawback to making your own vanilla extract is that it takes time. A couple months of time. This process is not for the impatient; I nearly went crazy waiting on mine to be ready! It is really fun, however, to watch the liquid turn from crystal clear to deep amber over those long, long weeks. But now that it's ready I love opening the jar, taking a whiff, dunking my measuring spoon in the seemingly bottomless well, pouring it in the mixing bowl and licking the spoon. Yes, licking the spoon. It seems almost too decadent to have such an abundance of vanilla extract, and I love it. I'll never go back to store bought.


Homemade Vanilla Extract
adapted from Simply Recipes

1/2 pint jar with tight-fitting lid
3 vanilla beans
vodka (I've also heard of people using rum. I used Rain organic vodka)

Split vanilla beans from end to end with a sharp knife, leaving the ends connected and place in jar. Fill jar with vodka, covering vanilla beans completely. Screw lid on tight. Give the jar a good shake. Place in a cool dark place, and shake it every few days. In about 8 weeks, your vanilla extract will be ready to use! You can keep filling the jar with vodka as you use your vanilla, shake the jar a few times a week and you'll never have to buy vanilla again!


Saturday, February 13, 2010

Chocolate-Dipped Marzipan Coins


Whenever there was a special occasion growing up, marzipan was my treat of choice. It was not available in the small town I grew up in - except for a short time when there was a much-loved (by me) candy store downtown - so it was only on birthdays and other holidays when I would get it. It came in a shallow little green mesh box, divided into 9 separate spaces. In each space was a molded marzipan fruit or vegetable, airbrushed some bright color or another. Thinking about it now, it sounds slightly repulsive, but back then it was magical. I would savor each piece, trying to stretch out my enjoyment as long as possible, but the marzipan never lasted more than a couple hours at best.


I was trying to come up with something to post that would be Valentine's Day appropriate, though sophisticated - nothing red, heart-shaped or containing catchy sentimental phrases. Not that there's anything wrong with those things, I'm just not so much in the Valentine's spirit this year.


These are treats that you could give anyone you love on V-Day, not just a significant other. They are also ridiculously simple to make.

They taste better than any marzipan I've ever eaten. They taste fresh, which is not usually something you get with the electric red strawberry-shaped version. They are moist, not too sweet, and tender. The store-bought variety can tend towards rubbery, and these are anything but.

If you have molds, you could certainly use them to make fun marzipan shapes. I rolled my marzipan out and used my smallest biscuit cutter.

If you need a last-minute Valentine to give someone, these are perfect. They are delicious, beautiful and only take about an hour from start to finish - including time for the chocolate to set.


Chocolate-Dipped Marzipan Coins
adapted from Smitten Kitchen


8 ounces blanched almonds
1 1/2 cups confectioner's sugar
1 tablespoon almond extract
4-5 tablespoons corn syrup*

3 ounces bittersweet chocolate, tempered

Place almonds in food processor. Grind to a fine powder, then process a little longer. About 2 minutes in all. Scrape bowl, and add confectioner's sugar and almond extract, process until well combined. Add corn syrup* and process for another minute. The mixture will be crumbly, but when you squeeze a bit of it, it should form a cohesive piece. Turn mixture out onto a board and knead until it comes together. Form a log, wrap in plastic and place in freezer while you temper the chocolate.

To temper chocolate: Place 2.5 ounces in a heat-proof bowl placed over a pot of simmering water. Melt chocolate, stirring frequently. When temperature is over 105, add remaining .5 ounces of chocolate and stir until melted. When the chocolate cools to 90 degrees, it is ready. Keep it at this temperature while you're dipping.

When the chocolate is ready, remove the marzipan from the freezer and roll it out to about 1/4" thick. Using a cookie cutter, biscuit cutter, knife, etc... cut out shapes as desired. Dip into chocolate, and place on a piece of parchment until chocolate is set.

* I've had a couple of comments from people who have made this, saying that the marzipan was extremely sticky and difficult to roll out. My suggestion is to start with 4 tablespoons of corn syrup, and test the marzipan to see if it stays together when squeezed in a clump. If it is still crumbly, add the additional tablespoon. You can also try dusting your rolling surface & pin with powdered sugar, though I have made this twice in the last couple of weeks and didn't need any, so the ideal is to have marzipan that is soft, moist, not crumbly and not sticky (though it will be slightly oily from the natural oils in the almonds).


Monday, February 8, 2010

Walnut Pralines


I love Charleston, SC. Though I live very close, the first time I went there was only about 2 1/2 years ago. Pretty much my entire trip was spent eating, which was not something I complained about. So many fantastic restaurants there, it is probably a good thing I don't live closer.

There is a sweet shop in downtown Charleston. I don't know what its name is, and frankly, it's probably a big tourist trap, but they make pralines. Lots of pralines. They give out free samples of these pralines, and they are oh so tasty. We intentionally walked past that shop several times a day. There was just something so addictive about those nutty chunks of melt-in-your mouth caramel-flavored sweetness.


I've been intending to make pralines for a few months, and finally had the chance a couple of days ago. I was amazed at how easy and quick these were.

I took one bite, and I was right back in Charleston.

These pralines are rich, sweet, satisfying. They have the consistency of fudge with the flavor of caramel, studded with walnuts which lend a slight bitterness. I think the next time I make them, I'll try toasting the walnuts - or whatever nuts I use. I think it would bring out a wonderful flavor that would compliment the sugary candy beautifully.


Walnut Pralines
adapted from marthastewart.com


2 cups sugar
3/4 teaspoon baking soda
1 cup heavy cream
1 tablespoon unsalted butter
small pinch of salt
2 cups coarsely chopped walnuts

Line two baking sheets with parchment, set aside. In a heavy-bottomed 3 quart saucepan, combine sugar, baking soda, salt and cream. Over medium-high heat, cook until deep golden brown, stirring occasionally. The temperature should be 235 on a candy thermometer. Add butter and walnuts, and stir until butter is melted. Drop spoonfuls of mixture onto prepared baking sheets about 2 inches apart. Work rather quickly, as mixture will become harder to scoop as it cools. Allow pralines to cool completely, about 1 hour.


Sunday, January 31, 2010

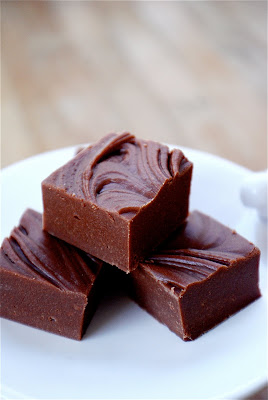
Creamy Chocolate Fudge


I've been trying to bring you this fudge for a long time. I would have given it to you sooner, but I hit a few bumps along the way.

I saw it originally on Tracey's blog, and knew immediately that I had to make it. I can't even tell you how many years its been since I ate a piece of fudge, and it looked so creamy and heavenly I got right to it.

The first time I made it, it didn't exactly work. It cooked too long, and turned into a strange - though delicious - sort of caramel. I later discovered that my thermometer was off by a none-too-insignificant 6 degrees. Sigh.

The next time I made it, I went solely by the times for each stage of the recipe and ignored the temperature altogether. This time it was perfect. I bagged it up and gave it out for Christmas gifts, thinking I'd have a chance to photograph it before it was gone. Boy oh boy was I wrong! Who knew I was among voracious fudge-eaters, and that it would last less than 6 hours in their hands! Should it have really surprised me, though, given the great chocoholism that runs in my family? Not to mention, we were in the middle of an ice storm and had no power or water, so I had things other than photos on my mind.

Then, I made it again. I had to post it! This time, I went by temperature - I had a new thermometer - and again, it cooked too long. I threw it out.

The next time I made this fudge - oh yes, there was a next time - it tasted fantastic and it was definitely fudge, but it wasn't as beautiful as the perfect batch. I photographed it, but knowing it could be better I just couldn't bring myself to post it.

Now we come to this week when I made it for the fifth time.


I decided to ignore the temperature, as it seemed like in all my experience with this recipe it isn't as important as the length of time the mixture actually cooks for. This time, it was perfect again! Ahhhhh. This fudge is heaven. It is so smooth and creamy, without a trace of grit that is so frequently present in the store-bought variety. It is rich and chocolate-y with a hint of salt. This is some serious fudge. I think you're gonna like it.


Creamy Chocolate Fudge
adapted very liberally from Fine Cooking via Tracey's Culinary Adventures


4 ounces bittersweet chocolate, roughly chopped
2 cups granulated sugar
1 1/2 cups heavy cream
3 tablespoons agave (or light corn syrup)
1 teaspoon salt
3 tablespoons cold unsalted butter

Line an 8"x8" pan with parchment. In a large, heavy-bottomed saucepan, combine chocolate, sugar, heavy cream, agave and salt. Bring to a boil over medium-high heat, stirring all the time. This should take 7-12 minutes - I find it takes around 10. Once boiling, cover pot and let cook for 2 minutes uninterrupted. Then remove the lid and cook for another 4 minutes without stirring. (The original recipe calls for a temperature of 236, but the last time I made it, it only reached 228 on an accurate thermometer and it was perfect). Remove from heat, add the butter without stirring and let it stand until it is 100 degrees, about an hour. Pour into the bowl of a stand mixer fitted with the whisk attachment and beat on high for 20 minutes. Then let it rest for about 10 minutes. Beat again on high for 5 minutes, and let rest for 5 minutes. Continue in this way until you can make a wave in the mixture (with your fingers, spoon, etc...) and it doesn't immediately melt back into itself. Pour into prepared pan. Smooth the top or make swirls in it. Let it stand several hours or overnight in the pan, uncovered. Remove parchment, place on cutting board and cut into squares. The fudge will be quite soft at this point. Separate squares and let them sit uncovered for several hours, until they firm up.

*I believe the problem with the batch of fudge that wasn't attractive enough was that I didn't beat it long enough. The top of it wouldn't hold a swirl, and the surface had lots of tiny bubbles. To be sure you've beaten it log enough, take a small dab of the warm fudge out of the mixer and place it on a plate, spoon, anything. Make a swirl in it with your finger. Come back a few minutes later, and if the swirl has remained and the fudge has hardened as it cooled, it is done. If not, keep beating.

Saturday, January 16, 2010

Cocoa Almonds


It seems that I am a few weeks too late with many of my recent posts. I can't seem to get away from making things that would be really great food gifts, these almonds included. Hopefully I'll remember all of them when the holidays roll around again!

These are so easy to make. So. Easy. Let me show you!


These almonds are the perfect treat for someone who doesn't like things that are terribly sweet, as they are coated in unsweetened cocoa powder.

When you put one of the almonds in your mouth, the bitter cocoa powder dissolves on your tongue, giving way to a thin layer of semisweet chocolate. Then you bite into it, crunching, releasing the almond's sweetness that mingles perfectly with the now melted chocolate. Oh yes, I tell you they are divine.


Cocoa Almonds

6 oz semisweet chocolate
2 cups almonds (raw or roasted)
1 cup unsweetened cocoa powder


In a heat-proof bowl set over a pot of simmering water, melt the chocolate, stirring occasionally until smooth. Add almonds and stir to coat completely with chocolate. In a medium-sized bowl, pour 1/4 cup of the cocoa powder. Add a large spoonful of the chocolate-covered almonds (about 12-15 almonds), and shake the bowl to coat them in cocoa. Using a skimmer or slotted spoon, scoop out the almonds, shaking all excess cocoa powder back into the bowl. Spoon cocoa-coated almonds onto a piece of parchment in a single layer until chocolate is set. Repeat with remaining almonds, adding more cocoa powder 1/4 cup at a time as needed.

*If you think these will be too bitter for you, you could add powdered sugar to the cocoa powder to taste.


Wednesday, January 13, 2010

Caramel Corn


I have two questions: Why have I never made caramel corn before?! Why did I have to go and make caramel corn?!

It is always a little dangerous to figure out the things you're capable of in your own kitchen.

Caramel corn isn't something I buy, it isn't something I think about, it isn't something I crave. I couldn't even tell you when the last time I had it was - though I'd be willing to bet I was still wearing braces and that the caramel corn came out of one of those tins with three flavors of popcorn in them that my school used to sell to raise money. Nothing good ever came out of one of those tins.

This caramel corn couldn't be more different.


I've been seeing different variations of caramel corn everywhere lately. Funny how food trends go. The recipe I used - or should I say, changed - is from a new book called DamGoodSweet, as seen on Orangette. I chose this one because it was basic, and could be altered easily enough so that my sons could eat it.


My version has no refined sugar in it - palm sugar has replaced the granulated, and agave was used instead of corn syrup. I also left out the nuts, because they are to difficult for the little guys to eat. I also upped the salt, because I wanted it to be more of a flavor than just a flavor enhancer. I just love sweet/salty treats!

I couldn't stop eating this caramel corn, it is so delicious. Fortunately, I only made 1/3 of the recipe. It is wonderfully crunchy, but not at all in a way that will break your teeth! It is sweet, and salty, and has an amazing rich caramel flavor from the palm sugar. It couldn't be easier to make, either. Is it too early to start thinking about Christmas, because this would make a great food gift!

I'd like to play around some with flavorings - different nuts, different spices - but for now, here is the basic recipe that is so good on its own, it really doesn't need any dressing up!


Caramel Corn
adapted from DamGoodSweet by David Guas and Raquel Pelzel via Orangette


10 cups popped popcorn - I popped mine in ghee on the stovetop, but you can use any kind you like (if you use microwave, it will probably have added salt, so keep that in mind when salting yours)
1 cup palm sugar
1/4 cup light agave
6 tablespoons unsalted butter
1/2 - 1 teaspoon salt
2 tablespoons water
1/2 teaspoon baking soda (measure this before you start cooking your caramel)
2 teaspoons vanilla extract (measure this before you start cooking your caramel)

Preheat oven to 250. Line a rimmed baking sheet with parchment. Place popped popcorn in large greased bowl, set aside. Combine palm sugar, agave, butter, salt and water in medium saucepan and bring to a simmer over medium high heat, stirring occasionally. Continue to simmer, stirring frequently until the mixture reaches 250 degrees on a candy thermometer. Remove pan from heat, and immediately add the baking soda and vanilla and whisk to combine. Quickly pour caramel over popcorn, and using a rubber spatula, stir to coat all of the popcorn evenly. Be gentle here, you want the popcorn to remain whole. Pour the popcorn onto the prepared baking sheet, spreading it evenly. Bake for 1 hour, stirring, turning and re-spreading the popcorn every 20 minutes. At this point, you can take a little taste and see if it is salty enough for you. I sprinkled some coarse sea salt on mine, and I highly recommend it! Let cool on rack for 20 minutes, then gently break apart and serve! You may store in an airtight container at room temperature for about 5 days, but I doubt it will last that long!


Saturday, January 9, 2010

SMS: Chocolate Cream Caramels


Sweet Melissa Sundays took a bit of a break around the holidays, and I got so used to not making the SMS treats, I completely forgot that we had resumed our schedule! Oops! My apologies to Jeanette of The Whimsical Cupcake for being tardy on this post.

Jeanette's selection was Chocolate Cream Caramels. Caramel-making has never scared me, so I was quite excited about this recipe!

This is definitely the simplest method I've ever used to make caramel - combine all ingredients (except chocolate and vanilla), bring up to 248 degrees, stir in chopped chocolate and vanilla, pour into pan to set! Simple!

I used agave in place of both the corn syrup in this recipe, and it worked fantastically well! These caramels are very tasty, and have a great texture - soft enough to eat right out of the fridge, and they don't stick to your teeth! I would like them to be creamier in flavor - I think there should be more heavy cream and less corn syrup (or agave) in the recipe. Other than that, they are very good!

You can find the recipe on Jeanette's blog.


Wednesday, January 6, 2010

Ghee


Ghee is also known as clarified butter. It is an oil that is used quite a lot in Indian cooking. I grew up eating vegetarian Ayurvedic - the ancient Indian system of health - food, and ghee was something we always had on hand. It is quite pricey to purchase in a store, but you can make your own easily and much more affordably!

You can use ghee in place of any oil you normally cook with, and it is also a great alternative to butter, as it doesn't burn as easily. I use it for everything from stir-fry to toast, and it is just wonderful. My relatives were all very happy to receive a jar of it for Christmas this year.


It has a very distinctive, though mellow flavor, and a soft and creamy texture. You can store it in an air-tight jar at room temperature for months. Try some, won't you?


Ghee

butter (any quantity you desire)

Place butter in a pan that is about 4 times the capacity of the amount of butter you are using. Over the lowest heat possible on your burner, cook the butter until all of the solids have sunk to the bottom of the pan and the melted butter is completely clear - not cloudy in the least. It can take over an hour to reach this point, so don't be alarmed if it seems to be slow-going. You don't want the butter to be simmering vigorously, because the milk solids will get toasted, and you'll have a big pot of brown butter. After the butter becomes clear, gently ladle through a fine mesh sieve into a jar. Let the ghee cool to room temperature before putting a lid on the jar to avoid condensation. The amount of ghee you'll end up with will be slightly less than the amount of butter you started with.


Monday, December 28, 2009

Peanut Butter Cups


Well, as if it wasn't bad enough that we had a snowstorm about a week ago that knocked out the power from 67,000 homes in the Asheville area (including mine), we woke up to this on Christmas morning. An ice storm! That knocked our power out! Yeesh! Let me tell you, the grand baking plans I had were entirely thwarted...

We were at my mom's house - about 15 minutes from mine. She lives in the woods, and thankfully has a fireplace and a gas stove, so we had heat and could cook, but that was about it. I won't go into the details of how we spent much of our day melting snow so that we could flush the toilet...

Anyway...

We didn't end up having Christmas dinner until yesterday. I made Mexican Wedding Cookies, a Peanut Butter Truffle Tart and World Peace Cookies, so no new posts from those, but I did whip up some Peanut Butter Cups last night! I had to have something to share with you, I've been so absent lately!

I've mentioned before that I've never been a fan of peanut butter, but there are a few things I really do love it in. A good peanut butter cookie is hard to beat, and you certainly can't go wrong with a peanut butter cup. There is really something about the combination of peanut butter and chocolate.

I really mean it when I say I whipped these up. They couldn't be easier to make, even at the last minute. Below is how I made them, but there is certainly a lot of room for adjustment depending on your personal preferences.


Peanut Butter Cups

12 oz best quality semisweet chocolate
1/4 cup peanut butter

small paper or foil candy cups - the ones I used must have held about an ounce, though unfortunately I threw away the packaging without looking... Next time, I would use smaller foil cups, as the paper ones were a tad difficult to pull off of the chocolate. With the size I used, I got 18 candies.

Melt chocolate in a heat-proof bowl set over a pot of simmering water. When completely smooth, spoon just enough into candy cup to cover the bottom, then place about 1/2 teaspoon of peanut butter on top and cover entirely with melted chocolate so that the surface is smooth and flat. Place in fridge to set.


Tuesday, December 22, 2009

Mendiants


Oh my, it feels like forever since I've posted anything, though it has only been a couple of days! This has been a crazy last week. First the snowstorm, which severely crippled sales at my store (which have been terrible anyway because of the economy), not to mention knocked out the power at my house for three days, and now here we are just 3 days from Christmas! Thankfully, the sun came out yesterday, and people have started braving the still icy sidewalks and shopping, hallelujah!

In case you missed my last post, I recently hosted a 5-course chocolate meal as part of the December version of Foodbuzz 24, 24, 24. As party favors, I made bags of these mendiants to give to my guests.

Mendiants are wonderful confections, because if done right you get a different and distinct flavor with each bite. There are limitless options for toppings, so you can really get creative. They are such fun treats to make, and surprisingly easy!

Go to it! There's still plenty of time to include these in holiday goodie bags!


Chocolate Mendiants

10 oz best quality semisweet chocolate, coarsely chopped
A few tablespoons of your choice of toppings, such as candied citrus peel, crystalized ginger, nuts (toasted or not) dried fruits, cocoa nibs, sea salt, fresh cracked pepper, culinary herbs, the list goes on!*

To temper chocolate:
Place 8 oz of chocolate in heat-proof bowl set over a pan of simmering water. Stir occasionally until melted, and measuring about 100 degrees. Add remaining 2 oz of chocolate and stir to melt, stirring until it reaches about 90 degrees.

Drop spoonfuls of tempered chocolate on parchment and use the back of spoon to swirl chocolate into a circle. When chocolate has begun to set but is still soft, add toppings. Use 3 - 4 toppings per disk, but don't overdo it. Alice Medrich calls mendiants an ode to simplicity, which is a lovely and perfect description for these heavenly disks.

* Some combinations I made were: nib, dried cherry and cracked pepper; candied orange peel, fig and lavender, candied lemon peel, crystalized ginger and almond; candied orange & lemon, fig and walnut.


Related Posts with Thumbnails

ShareThis