Sunday, January 31, 2010

Creamy Chocolate Fudge


I've been trying to bring you this fudge for a long time. I would have given it to you sooner, but I hit a few bumps along the way.

I saw it originally on Tracey's blog, and knew immediately that I had to make it. I can't even tell you how many years its been since I ate a piece of fudge, and it looked so creamy and heavenly I got right to it.

The first time I made it, it didn't exactly work. It cooked too long, and turned into a strange - though delicious - sort of caramel. I later discovered that my thermometer was off by a none-too-insignificant 6 degrees. Sigh.

The next time I made it, I went solely by the times for each stage of the recipe and ignored the temperature altogether. This time it was perfect. I bagged it up and gave it out for Christmas gifts, thinking I'd have a chance to photograph it before it was gone. Boy oh boy was I wrong! Who knew I was among voracious fudge-eaters, and that it would last less than 6 hours in their hands! Should it have really surprised me, though, given the great chocoholism that runs in my family? Not to mention, we were in the middle of an ice storm and had no power or water, so I had things other than photos on my mind.

Then, I made it again. I had to post it! This time, I went by temperature - I had a new thermometer - and again, it cooked too long. I threw it out.

The next time I made this fudge - oh yes, there was a next time - it tasted fantastic and it was definitely fudge, but it wasn't as beautiful as the perfect batch. I photographed it, but knowing it could be better I just couldn't bring myself to post it.

Now we come to this week when I made it for the fifth time.


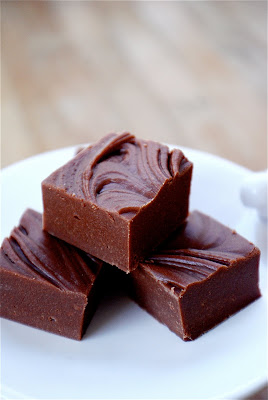
I decided to ignore the temperature, as it seemed like in all my experience with this recipe it isn't as important as the length of time the mixture actually cooks for. This time, it was perfect again! Ahhhhh. This fudge is heaven. It is so smooth and creamy, without a trace of grit that is so frequently present in the store-bought variety. It is rich and chocolate-y with a hint of salt. This is some serious fudge. I think you're gonna like it.


Creamy Chocolate Fudge
adapted very liberally from Fine Cooking via Tracey's Culinary Adventures


4 ounces bittersweet chocolate, roughly chopped
2 cups granulated sugar
1 1/2 cups heavy cream
3 tablespoons agave (or light corn syrup)
1 teaspoon salt
3 tablespoons cold unsalted butter

Line an 8"x8" pan with parchment. In a large, heavy-bottomed saucepan, combine chocolate, sugar, heavy cream, agave and salt. Bring to a boil over medium-high heat, stirring all the time. This should take 7-12 minutes - I find it takes around 10. Once boiling, cover pot and let cook for 2 minutes uninterrupted. Then remove the lid and cook for another 4 minutes without stirring. (The original recipe calls for a temperature of 236, but the last time I made it, it only reached 228 on an accurate thermometer and it was perfect). Remove from heat, add the butter without stirring and let it stand until it is 100 degrees, about an hour. Pour into the bowl of a stand mixer fitted with the whisk attachment and beat on high for 20 minutes. Then let it rest for about 10 minutes. Beat again on high for 5 minutes, and let rest for 5 minutes. Continue in this way until you can make a wave in the mixture (with your fingers, spoon, etc...) and it doesn't immediately melt back into itself. Pour into prepared pan. Smooth the top or make swirls in it. Let it stand several hours or overnight in the pan, uncovered. Remove parchment, place on cutting board and cut into squares. The fudge will be quite soft at this point. Separate squares and let them sit uncovered for several hours, until they firm up.

*I believe the problem with the batch of fudge that wasn't attractive enough was that I didn't beat it long enough. The top of it wouldn't hold a swirl, and the surface had lots of tiny bubbles. To be sure you've beaten it log enough, take a small dab of the warm fudge out of the mixer and place it on a plate, spoon, anything. Make a swirl in it with your finger. Come back a few minutes later, and if the swirl has remained and the fudge has hardened as it cooled, it is done. If not, keep beating.
Friday, January 29, 2010

Coconut Chocolate Chip Cookies


In addition to croissants, the food (other than broccoli) that marked my childhood in the most significant way is chocolate chip cookies.

My mom and I are quite the chocolate chip cookie connoisseurs, and are very particular about what we consider to be the perfect cookie. We have varying opinions on what that is - she is a huge fan of Alton Brown's The Chewy (which I've made for her several times but never posted), while I love the New York Times chocolate chip cookie. She likes things in her cookies; coconut and nuts to be precise. I am more of a purist. Every time I make a batch of chocolate chip cookies, my mom tells me they need coconut, so when I saw this recipe in The Sweet Spot, I knew I had to make them for her.

After making this fantastic Condensed Milk Pound Cake, I purchased the book it came from. It is full of wonderful and unusual recipes that you'll be seeing more of in the coming weeks. So far, this book has been a great investment.

These cookies are delicious. The coconut is toasted before being added to the dough, bringing out a nuttiness that is really welcome. I was afraid the coconut would be an overpowering flavor, but it wasn't - I think the toasting helps with that as well - it is subtle though unmistakably there, and it lends a chewiness to the cookie. The cookie is soft, but not cakey. The outside is slightly crispy, though it doesn't have quite the textural contrast between the interior and exterior that the New York Times cookie has - the one thing that I think could be improved upon.

My mom loved these, and would like me to make them again at my earliest convenience. Which I'm sure she wishes was yesterday. I loved them too. This is cookie we agree on, making it a definite winner.


Coconut Chocolate Chip Cookies
adapted from The Sweet Spot: Asian Inspired Desserts by Pichet Ong & Genevieve Ko

1 1/3 cups (4 oz/113 gr) shredded unsweetened coconut, toasted to golden brown and cooled completely
2 cups (11 oz/310 gr) unbleached flour
1 1/2 teaspoons baking powder
1 cup (8 oz/226 gr) unsalted butter, softened
1 cup + 1 tablespoon (6 oz/169 gr) tightly packed dark brown sugar
3/4 cup + 2 tablespoons (6 oz/169 gr) granulated sugar
1/2 teaspoon salt
2 large eggs
2 teaspoons vanilla extract
2 1/2 cups (11 7/8 ounces/336 grams) bittersweet chocolate chips or roughly chopped chocolate


Sift together flour and baking powder, set aside.

Put butter, both sugars, salt and cooled toasted coconut in bowl of stand mixer fitted with paddle attachment. Mix on medium until light and fluffy, about 3 minutes. Add eggs one at a time, mixing for 30 seconds after each addition. Stir in vanilla. Turn mixer down to low and add half of flour mixture and mix until just combined. Add remaining flour, mixing until just combined. Stir in chocolate. If you have time cover dough and chill for at least 2 hours before baking.

When ready to bake, preheat oven to 325. Line baking sheet with parchment. Form dough into balls about 1 inch in diameter and place about 2 inches part on baking sheet. Bake 12-15 minutes, or until golden brown and turning crisp around the edges.


Thursday, January 28, 2010

Lemon Olive Oil Cake


You my recall I made a lemon pound cake a week or so ago, and I wasn't so hot on it. It wasn't lemony enough, and was just generally blah. Though it left me wanting a great pound cake I didn't make much of an effort to find one, as I had moved on to other tasty treats.

Now, I have a serious baking book habit. Serious. I basically want every baking book ever written, and have a good number of them already. The most recent addition to my collection is The Craft of Baking, and on my first flip-through this is the recipe that jumped out at me. I love the name of this cake, and everything it evokes. Olive oil; earthy, fruity, tangy - the perfect complement to zippy, tart lemons.


This is my first olive oil cake, per se, though I have used olive oil several times in baking - whenever a recipe calls for a different oil. So I suppose what I should say is that this is the first time I have baked something where olive oil was intended to be a contributing flavor. Oh, how I loved it.

This, people, is a lemon cake.

This is everything a lemon cake should be. It is also everything a pound cake should be. The crumb is tight and tender, supple even. It is perfectly lemony. Lemony, but not tart. The real triumph of this cake, however is its texture. This cake is so moist, it makes a sound when you tear a piece off. It makes a sound!!! It does not have a drop of extra grease, either. It isn't a very sweet cake, which I appreciate, though the top is sprinkled with sugar before baking, creating a paper-thin crunchy crust. Perfection.


The only downside of this superb pound cake is that it is small and it requires a lot of dishes. You may want to double the recipe and save one loaf for later. I say this under the naive delusion that two loaves have a chance of lasting longer than one (which lasted exactly 6 hours in my house).


Lemon Olive Oil Cake
adapted from The Craft of Baking by Karen DeMasco


3/4 cup + 2 tablespoons unbleached white flour
3/4 teaspoon baking powder
1/2 teaspoon salt
2 large eggs
1/2 cup sugar
zest of 1 lemon
1/3 cup extra virgin olive oil
1 1/2 tablespoons heavy cream
fresh squeezed juice from 1/2 lemon, strained
3 1/2 tablespoons unsalted butter, melted
1 tablespoon sugar for topping cake

Preheat oven to 350. Line an 8 1/2" x 4 1/2 " loaf pan with parchment, butter parchment and any pan that is exposed. Sift together flour, baking powder and salt into a small bowl. Set aside. Place 2 inches of water in a medium saucepan and bring to a simmer. In a heat-proof bowl - preferably the bowl of a stand mixer - combine eggs, sugar and zest, and place bowl over pot of simmering water, whisking until egg mixture is warm to the touch - this doesn't take very long. Remove bowl from pot and attach to mixer fitted with whisk attachment - if you're not using a stand mixer, place bowl on counter and use hand mixer - and beat on medium until mixture thickens and becomes pale, about 5 minutes. Meanwhile, whisk together olive oil, cream and lemon juice in a small bowl. When the egg mixture has reached appropriate thickness, drizzle olive oil mixture over it and mix until combined. Turn mixer to low and add dry ingredients, mixing until just combined. Stir in melted butter. Pour batter into prepared pan, smooth batter and sprinkle with tablespoon of sugar. Bake until top of cake is golden, and tester inserted into the center comes out clean, about 50 minutes. Let cool for 15 minutes in pan, then remove to rack to cool completely before cutting.

Wednesday, January 27, 2010

One-Step Croissants


Croissants are a very special food for me and my mom. I have more wonderful memories associated with croissants than almost any other food I can think of.

When I was growing up, we didn't have a lot of money. We didn't eat out, and we ate simple food. One treat that we ate about once a month though, was croissants. Not fancy croissants, mind you, they were frozen in fact. But they were something that seemed so decadent and so sophisticated. I just loved them. There was a ritual to the way my mom and I ate our croissants; we heated them up, tore off one end, hollowed out the insides and stuffed them with a link of veggie sausage. Sometimes we ate them with cheese, sometimes not. They were especially wonderful when dipped in mustard.


The summer before my senior year of high school, my mom arranged for us to go to Europe by becoming a tour leader for an educational tour company. The tour was 2 weeks in Italy, and then the two of us stayed in Europe for an extra 2 weeks which we spent in Greece. Some of our first nights there were spent in Nafplio in a pension that was above a bakery. You have not known heaven until you've woken up every morning to the smell of fresh bread, and the satisfaction of attaining that bread through nothing more difficult than a flight of stairs and a few dollars. It quickly became an addiction, and even after leaving Nafplio we couldn't function in the mornings until finding ourselves a fresh croissant and our other weakness - a cup of hot cocoa.

I've wanted to make croissants for as long as I have been baking. There are a lot of recipes out there, but the one that caught my eye was this one from The Modern Baker by Nick Malgieri. I've had the book for a few months but hadn't made anything out of it yet, and this seemed like the perfect opportunity.

These croissants are a whole lot easier - and less time-consuming - than traditionally made croissants, anything that helps me save time is pretty great in my book.

I only made a half recipe of these, because I made them by hand instead of with a food processor as the original recipe calls for. They turned out beautifully, so I wish I made a full batch!

These croissants are delicious; unbelievably flaky, buttery, tender on the inside, crisp on the outside - all in all, perfect little croissants!

Are they as good as croissants made with a preferment, laminated dough, and given lots of time to rise? I'll have to let you know when I find the time to make those! I'm planning on trying out the recipe from Tartine sometime soon, they come highly recommended. Until then, these are a wonderful alternative that are ready in a few short hours, and that in itself makes them amazing. Next time, I won't make the mistake of only making a half recipe!


One-Step Croissants (full recipe)
adapted from The Modern Baker by Nick Malgieri


1/2 cup milk
4 teaspoons instant yeast
2 cups unbleached white flour
2 tablespoons palm sugar
3/4 teaspoon salt
20 tablespoons (2 1/2 sticks) cold unsalted butter
egg wash: 1 egg, well beaten with a pinch of salt


Heat half of the milk in a small saucepan (keeping the other half of the milk cold) until it is lukewarm - about 90 degrees. Pour into a small bowl and whisk in yeast. Set aside. In a large bowl, combine flour, palm sugar, and salt. Add 4 tablespoons of the butter - keeping the rest of it in the refrigerator - and using a pastry blender, cut the butter in until it is finely mixed into the dry ingredients. Cut the rest of the butter into small chunks and add them to the mixture. Cut in with a pastry blender, just until the chunks have broken up somewhat - about 20 strokes with the blender - but large pieces remain. Add the cold milk to the yeast mixture and pour it into the bowl. Cut the dough once more with pastry blender for about 45 seconds - the dough will not form a ball. Turn the dough out onto a well-floured board, flatten the dough into a disk and roll out into a rectangle about 12" x 15". Fold dough into thirds - like a business letter - then roll up the folded dough and press into a rough square. Lightly flour dough, place in a plastic bag and seal it. Let dough rise inside the bag for 1 - 1 1/2 hours. The dough will not double in size. After the dough has risen, using the palm of your hand, deflate the dough and place bag in the fridge for at least 1 hour or as many as 8 hours. Remove dough from bag, place on well-floured board, gently deflate, and roll out to a rectangle about 12" x 15". If the dough seems hard to roll, let it rest for 5 minutes then resume rolling. If at any point the dough becomes too soft, slide a baking sheet under it and place it in the fridge for 15 minutes. Once the dough is rolled out, straighten the edges, and using a sharp knife (or pizza wheel) cut dough lengthwise into two strips, then cut each strip into 6 triangles. Roll each triangle starting at the flat end and ending at the point. Tuck point under, and place on parchment-lined baking sheet. (You'll need 2) Repeat with remaining triangles until all are rolled. Cover each sheet of rolled dough with buttered plastic wrap and let rise until they are almost doubled in size. About 20 minutes before the rise is complete, preheat oven to 350. Place racks in upper and lower thirds of oven. Just before baking, carefully brush each croissant with egg wash, making sure it doesn't pool under the dough. Bake for about 15 minutes, then rotate pans. Bake for another 10-15 minutes or until they are deep golden brown and springy to the touch. Slide parchment with croissants from baking sheet to rack to cool.


Sunday, January 24, 2010

Coconut Cake with Chocolate Chunks


There was a time when I would have turned up my nose at this baked treat, simply because it is a cake. Even the chocolate wouldn't have swayed me. Until quite recently, I just wasn't a fan of cakes. Or so I thought. I have now come to realize that I had never had a good cake, or at least not enough of them.

In the last year I have actually come to love cakes.

For reasons like this. And this. And this. (Please excuse the photos for those links, most are from very early in my blogging...)

Oh, and this.


I made this coconut cake for my aunt's birthday today. I find it rather amusing that I have upwards of 40 baking books, a handful of which are dedicated to cakes, all of which are under-used, and yet I turn to the internet when looking for a recipe. Ah well, when there are things this wonderful on the internet, what can you do?

I knew I wanted a coconut cake that contained both shredded coconut and coconut milk. As soon as I happened upon this recipe from Bon Appetit, I knew I had found the one. This time, it was the chocolate that swayed me.


This cake is amazingly fluffy, making it impossibly light without nearing the texture of an angel food cake. It is tender, slightly dense, and oh so moist. The level of sweetness is perfect, especially when paired with the chunks of semisweet chocolate. The coconut on top becomes chewy with crunchy edges in the oven, and forms a sort of macaroon topping for the cake. The only thing I will change when I make it again is the amount of chocolate. It needs more. Next time, I will add an additional 3 ounces of chocolate to the batter, bringing the total amount in the cake up to 9 ounces.


Everyone in my family loved this cake, and it was devoured in record time. Many people commented that it was the best cake they had ever eaten (though they did echo my sentiment about the slight chocolate deficiency).


Coconut Cake with Chocolate Chunks and Coconut Drizzle
adapted from Bon Appetit


For the Cake:
1 3/4 cups unbleached white flour
2 teaspoons baking powder
1 teaspoon salt
1 cup unsweetened shredded coconut
3/4 cup sugar
1/2 cup unsalted butter, softened
2 large eggs
1 teaspoon vanilla extract
1 cup unsweetened coconut milk
6 ounces semisweet chocolate, roughly chopped (or 9 ounces if you are a chocolate lover)
1/2 cup sweetened flaked coconut, or 1/2 cup unsweetened shredded coconut tossed with 1 teaspoon agave until all coconut is coated and ever so slightly damp


For the Coconut Drizzle:
3/4 cup powdered sugar, sifted
2-3 tablespoons unsweetened coconut milk
1/2 teaspoon vanilla extract


Preheat oven to 350. Butter and flour a 9 inch spring-form cake pan. Sift flour, baking powder and salt into a medium-sized bowl. Stir in 1 cup coconut. Set aside. In the bowl of a stand mixer fitted with a paddle attachment cream butter and sugar until light and fluffy. Add eggs one at a time, mixing well after each addition. Beat in vanilla. Add dry ingredients in 3 additions, alternating with coconut milk in 2 additions, mixing until just combined with each addition. Fold 3 ounces (or 6 ounces) of the chocolate chunks into batter using a rubber spatula. Pour batter into prepared pan and smooth top with spatula. Sprinkle remaining 3 ounces of chocolate as evenly as you can on top of the batter, top with 1/2 cup of coconut. Bake for 60-70 minutes. Check cake at around 40 minutes. If it looks like it is browning too quickly, place a foil tent over the pan. Remove cake from oven when a tester placed in the center of the cake comes out clean. Let cool for at least 30 minutes before removing from pan. Cool completely before cutting. (I wasn't able to wait that long, hence the slightly shaggy slices. I will say, it was rather delicious warm, as the chocolate was melty. If you don't mind shaggy slices, serve it warm by all means!)

Coconut Drizzle:
Whisk together sugar, vanilla extract and 2 tablespoons of coconut milk. Add more coconut milk as needed until mixture is pourable. I did this in a pyrex measuring cup, making drizzling very easy.


Saturday, January 23, 2010

Marmalade Tart


Wow, a lot of citrus around here lately, eh? I kind of forgot how much I love citrus. It was all I wanted as a kid, then I got all caught up in chocolate and didn't eat many citrus desserts for many years. I'm so glad to be re-discovering it. How great is it that the brightest, sunniest fruits are in season when it is cold and grey! I mean, look at this tart; can you imagine a happier looking dessert on a dreary January day? I can't!


The recipe for this tart comes from The Big Sur Bakery Cookbook. I received this book for Christmas, and until yesterday hadn't had a chance to look at it very carefully. It has a lot in it that I don't eat - lots of meat, people, lots of meat - but it is a beautiful book, and I love the way it is structured. Each chapter has a bio on one of the people who grow (or otherwise cultivate) the produce, honey, etc. that the bakery uses.

As soon as I saw this tart, however, I had the feeling that the book was worth having for that recipe alone. I was right.

The tart is composed of a sturdy, citrus-scented crust spread with a layer of marmalade, topped with an almond cream which is studded with bits of toasted almonds, and to finish it off, thin slices of fresh citrus are placed on top.


While there are several components, they are all rather simple to execute. The only thing that gave me trouble was the dough for the crust. It was very crumbly, even with several extra tablespoons of orange juice, and was a real pain to roll out. I had to patch it more than I have ever had to patch any other dough I've ever worked with. After it came out of the oven, however, I loved the taste and texture of the crust, so I don't think I'd substitute a different dough.

This tart has a lovely balance of flavors and textures: the firm, almost crunchy crust plays beautifully off of the creamy filling and soft fruit; the sweetness of the almond cream is tempered by the fresh citrus. It is a dessert that is equally appropriate for a fancy holiday dinner or an informal breakfast.


Marmalade Tart


For the Tart Dough
1 1/2 cups cold unsalted butter cut into small cubes
3 cups unbleached white flour
1/2 cup sugar
grated zest of 1 orange
1 teaspoon salt
2 tablespoons - 4 tablespoons orange juice

For the Almond Cream
6 tablespoons unsalted butter, softened
1/2 cup + 1 tablespoon powdered sugar, sifted
1 1/2 teaspoons almond extract
grated zest of 1 orange
1/2 teaspoon salt
1 egg, beaten
3 tablespoons unbleached white flour
3/4 cup almonds, toasted until brown on the inside, then finely chopped

For Assembling the Tart
1 cup high-quality citrus marmalade at room temperature
2 medium-sized citrus fruits (or more if you want more variety)
1 egg, beaten
2 tablespoons sugar
1 tablespoon cold unsalted butter


To make tart dough:
Combine butter with flour, sugar, orange zest and salt in the bowl of a stand mixer, place in freezer for 30 minutes. Remove from freezer, covering your hands so they don't stick to the metal bowl, attach to mixer. Using paddle attachment, mix until very crumbly. Add orange juice a little at a time until the dough comes together. Turn out onto floured board and knead until dough is smooth, about 2 minutes. Flatten into a disk, wrap in plastic and place in fridge for at least 30 minutes.

While dough is chilling, make almond cream:
In the bowl of a stand mixer fitted with the paddle attachment, cream the butter, powdered sugar, almond extract, zest and salt until light and fluffy. Add beaten egg slowly, and mix until incorporated. Add flour and mix until smooth. Using a rubber spatula, fold in the toasted, chopped almonds.

Preheat oven to 375. Line a cookie sheet with parchment.

Remove tart dough from fridge and place on a well-floured board. Roll out to 1/4" thick. Using a sharp knife, cut a rectangle 12" x 16". Carefully transfer rectangle to prepared cookie sheet. Spread marmalade over dough, leaving a 1" border all the way around. Spread almond cream as evenly as you can over the marmalade. Fold edges of dough in to create a crust. Place in fridge for 30 minutes.

Prepare the citrus for topping:
Cut both ends off of each piece of citrus, creating a flat surface. Place fruit on one of the flat ends, and following the curve of the fruit, cut off all of the rind and pith. Then slice into rounds, 1/4" thick each. Remove seeds as necessary. Remove tart from refrigerator and lay citrus slices evenly over the surface. Place them close together, but not overlapping. Brush the edges of the tart with the beaten egg, and dust the whole thing with sugar, going heavier on the dough than the fruit. Place a dot of butter on each slice of citrus to prevent burning. Bake tart for 40-45 minutes, or until both the almond cream and crust are a deep golden brown. Cool on rack for at least 15 minutes before slicing. Serve warm or at room temperature.


Thursday, January 21, 2010

Salted Caramel & Toasted Walnut Shortbread Bars


I am really at a loss for words with these bars. They are so delicious, they have taken the words right out of me.

I actually made them for the first time a week ago, and couldn't get a photo I liked enough before they all got eaten. I couldn't very well post an inferior photo of such a superb treat, so I just had to make them again! The ways in which I suffer.


The base for these bars is a brown sugar shortbread. It is rich and buttery (without being greasy), it is smooth, almost creamy and melts in your mouth. On top of it is a layer of caramel. Beautifully smooth caramel, soft caramel, salted caramel. The caramel contains large pieces of toasted walnuts, whose bitterness are a perfect counterpoint for the sweetness of the other elements. Topping all of this is a light sprinkling of coarse sea salt. Wow.

These bars are surprisingly easy to make, which may or may not be a good thing. I haven't yet decided. Another thing I haven't decided is whether chocolate would improve upon these already-so-close-to-perfection bars. I'll let you know when I figure it out.


Salted Caramel & Toasted Walnut Shortbread Bars
adapted liberally from Cookin' Canuck


For the Crust:
9 tablespoons (4 1/2 ounces) unsalted butter, softened
1/4 cup firmly packed dark brown sugar
2 tablespoons granulated sugar
1/2 teaspoon salt
1 1/2 cups unbleached white flour

For the Filling:
6 tablespoons (3 ounces) unsalted butter
1/4 cup firmly packed dark brown sugar
scant 1/4 cup granulated sugar
1/4 cup agave
1 tablespoon + 1 1/2 teaspoons heavy cream
1/2 teaspoon salt
1 cup coarsely chopped walnuts, toasted until golden brown
1/2 teaspoon vanilla extract
coarse sea salt for finishing


Preheat oven to 375. Line an 8x8 baking dish with a piece of parchment, letting it hang over by a couple of inches on each end. In the bowl of a stand mixer fitted with the paddle attachment, cream butter, salt and sugars until light and fluffy, about 2 minutes. Add flour and stir until just combined. Press firmly and evenly into pan, prick all over with a fork and place in fridge for 2o minutes. Then bake for 18-20 minutes, or until golden brown. Place on cooling rack while you make the filling.

To make the filling: Reduce oven temperature to 325. Place butter, sugars, agave, heavy cream and salt in medium sized saucepan over medium-high heat. Bring to a boil, stirring constantly. Continue to boil for about three minutes, or until caramel is thickened and coats the back of a spoon. Remove from heat, stir in toasted walnuts and vanilla, and pour into crust. Place back in the oven and bake for 10-15 minutes, or until mixture has begun to bubble. Remove from oven and let cool on rack, or to speed things up you can place pan in the refrigerator. When filling is lukewarm, sprinkle with coarse salt. Wait until bars are completely cooled, then remove from pan lifting by the overhanging parchment. Peel parchment off, and cut with a sharp knife.

Related Posts with Thumbnails

ShareThis