Saturday, May 22, 2010

Rhubarb Curd Shortbread Bars


Curd. What an unappealing, clunky name for something so silky and delicate and delicious. Most of the curd around is of the lemon variety. I've been meaning to make it for some time, and just had trouble finding the initiative to actually do it. Not so with rhubarb curd. It never occurred to me that such a thing could exist, and as soon as I knew it did, I couldn't wait to make it.

Actually, there are about 37,052 rhubarb recipes that I want to try this Spring. I can't believe how versatile this strange stalk is - take a look at this! - and I can't wait to further explore it's many facets.


These bars are heavily adapted from a recipe I saw on Food52 - the curd is completely different, and the flavor of the shortbread is simplified. And they almost didn't happen. I ran into just about every problem possible when making these - I won't bore you with all of the details, suffice it to say I was shocked that they turned out so well. But, oh, how well they did come out... They are wonderful. Light and refreshing, creamy, sweet - but not too sweet. The rhubarb flavor is subtle, and almost delayed in its arrival. With nearly every bite I took, it gently snuck up on me.


This dessert is so unabashedly feminine, it almost seemed wrong to be eating it from the pan with a spoon. Ahem. To really do these bars justice, they should be served on dainty plates with a cup of tea.

The shortbread base is heavily flavored with ginger, and is a lovely complement to the curd. It was, however, incredibly crumbly - as you can see in the photo below; very frustrating. While crumbly is typically a good thing in regards to shortbread, here it made the bars very difficult to remove from the pan. I should have followed my instincts and lined the pan with parchment. Let that be a lesson!

These bars are fantastic, even when eaten with a spoon, and my mind is now reeling with all kinds of new curd possibilities!


Rhubarb Curd Shortbread Bars


For the Shortbread
12 tablespoons unsalted butter
1/4 cup powdered sugar
1/2 teaspoon salt
1 1/2 cups unbleached white flour
2 teaspoons ground ginger


Line an 8x8 baking pan with parchment, butter parchment, set aside. Combine all ingredients in the bowl of a stand mixer fitted with the paddle attachment. Mix until just combined. Press into pan (mine was actually rather fluid as my butter was incredibly soft, so in this case, pour into pan), smooth the top and place in freezer for 30 minutes. In the meantime, preheat oven to 350. After 30 minutes, bake shortbread for about 30 minutes, or until evenly golden brown. Cool crust completely. In the meantime, make the curd.


For the Curd
1 cup rhubarb juice (from about 1 pound of rhubarb)*
3/4 cup sugar
6 large eggs
2 tablespoons lemon juice**
1 1/2 sticks unsalted butter, cut into chunks
heaping 1/4 teaspoon salt
zest from 1 large lemon

Whisk together rhubarb juice, sugar, eggs, lemon juice and salt in a large heavy-bottomed pan until well-combined. Add butter and cook over medium-low heat, stirring without stopping until curd is thick enough that it holds the marks from the whisk. Pour curd into a bowl and stir in zest.

When crust is cool, top with curd and smooth surface. The curd layer should be about the same thickness as the shortbread layer, so if you seem to have a lot of curd, don't feel you have to use it all. Bake for another 20 minutes. Place in fridge for 30 minutes to set curd. Let cool completely before slicing.

*If you don't have a juicer, you can follow these instructions.

** Don't leave out the lemon juice! For some reason, I wasn't going to include it. My rhubarb juice was the most gorgeous shade of dark pink until I added the eggs. Then it turned purple. Then green. It wasn't pretty. I actually turned off the burner and almost gave up. Then I realized that the lemon juice was there to preserve the color as much as to provide additional tang. I had a tad more rhubarb juice, so I added lemon juice to it, and added that to my pan. Thankfully, the color transformed! It wasn't as deep a pink as I would have liked, but at least it was pink! If lemon juice was added from the get go, it would have been a different story. One of the many road-blocks I encountered...

Wednesday, May 19, 2010

TWD (rewind): La Palette's Strawberry Tart


The TWD recipe for this week was supposed to be Apple-Apple Bread Pudding (and it was supposed to be posted yesterday - oh, details, details...), but I am just not a fan of bread pudding. Instead of skipping this week entirely, I decided to go back into the archives and bake something the group made before I was a member.


My mind immediately went to this tart. I've thought about it a lot since seeing it for the first time last year. So simple, so perfect. Seeing as I had a tub of local strawberries that needed to be used, I knew this was the perfect choice.


My crust is dark and speckled, because I used palm sugar to sweeten it instead of powdered sugar. I was unsure of how this would affect the outcome, but I wanted my boys to be able to eat it, so I went ahead and tried it out. The crust was fantastic. Crispy, and much more shortbread-like than it is with powdered sugar. Plus, I like the rustic effect the palm sugar lends to it.


The only other elements besides a crust are jam and strawberries. Couldn't be simpler! I used a fruit-only spread for the jam, and tossed my strawberries in a tad of agave, mostly to give them a nice shine - they were so sweet, they didn't need anything!


This tart might be my boys' favorite thing I've ever baked. They couldn't get enough. They ate a third of it in one sitting. Keep in mind they're 1 1/2 and 3 1/2, so that's quite a feat!


It is so perfect in it's simplicity and it is incredibly versatile - you could use any fruit and jam combination you can think up! If you had the tart dough prepared in advance, you could throw this dessert together in no time at all. I'm sure it would be fantastic with some fresh whipped cream on top, but ours didn't last long enough to make any! Dorie also suggests fresh cracked pepper on top. I did try a piece this way, and I was surprised at how much I enjoyed it. The pepper was earthy and slightly biting, imparting a lovely contrast to the sweet berries and jam, and I plan on cracking pepper on all manner of desserts from now on.


La Palette's Strawberry Tart
adapted from Baking from My Home to Yours


Best quality strawberry jam
1 quart ripe strawberries - trimmed and halved if they're large, and tossed in 1-2 teaspoons of light agave; just enough to give them a shine, not so much that they're dripping
1 9-inch tart shell made with Sweet Tart Dough (recipe follows)

Sweet Tart Dough
1 1/2 cups white wheat flour
1/2 cup palm sugar
1/4 teaspoon salt
1 stick + 1 tablespoon very cold (or frozen) unsalted butter cut into small pieces
1 large egg yolk

Put flour, palm sugar and salt in bowl of food processor and pulse a couple times to combine. Add butter pieces to bowl, and pulse until butter is coarsely cut in, with pieces of varying sizes. Stir egg yolk to break it up, and add it to food processor a little at a time, pulsing after each addition. When the whole yolk is in, process in long pulses until the dough begins to clump. Turn dough out onto board, and knead it just enough to incorporate any flour that didn't get mixed in. Press dough into a well-buttered 9-inch tart pan with removable bottom. Freeze for at least 30 minutes - preferably longer - before baking. Preheat oven to 375. Butter the shiny side of a piece of aluminum foil and fit it tightly across the crust, buttered side down. Bake for about 25 minutes, then remove the foil and bake for another 8-10 minutes, or until the crust is evenly browned and firm to the touch. Let crust cool completely.

Finishing the tart
Spread an even layer of jam on the crust, add strawberries. Tart is best when eaten immediately after being assembled.


Sunday, May 16, 2010

Whole Wheat Chocolate Chip Cookies


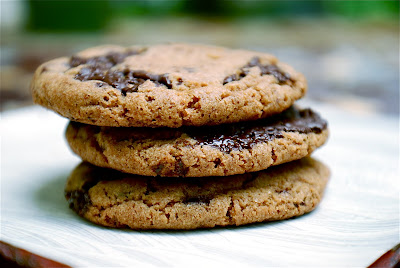
Not be be repetitive or anything, but I have another one for you from Good to the Grain. I can't help it, I love this book. This was actually the first recipe that I marked to make when I received the book - I mean, they're chocolate chip cookies! Plus, they are the first recipe in the book - but I went with slightly more unusual recipes when I started to bake from it. Then I found myself with a little unexpected time on my hands...

I have a 3 1/2 year old and a 1 1/2 year old, so needless to say, I've suffered my fair share of sleep deprivation. It isn't a terribly common occurrence, but every few weeks my younger son decides that sleep just isn't for him and around 2 in the morning he wants to get up and play for a couple of hours. Well, Friday night was one of those nights. After trying all of my tricks to get him back to sleep, I gave up and decided to bake. This recipe immediately came to mind - I had all of the ingredients and it was simple enough that I didn't think I'd be able to screw it up in my half-asleep state. Thankfully, I was right.

I'm a rather harsh critic when it comes to chocolate chip cookies, so I wasn't sure what to expect from these; they use 100% whole wheat flour, which is fairly unusual for most baked goods.

I served these at a class I gave at my store on Saturday afternoon on cloth diapering and baby wearing, and people were crazy for them. Everyone asked for the recipe, and one woman told me they were the best cookies she had ever eaten! They were a hit!

The first thing that surprised me about these cookies, was the fragrance of the dough; it smelled almost like it contained brown butter and had a stronger aroma than any dough I've ever made. They baked up beautifully, and I couldn't wait to take my first bite. Verdict? They are delicious.

The cookies are soft and chewy, generously studded with bittersweet chocolate chunks, and the whole wheat flour adds a sweet, earthy, nutty flavor that is amazingly complementary to the chocolate. I have to say, these chocolate chip cookies are second only to the ones I made a couple months ago that are a hybrid between the Cooks Illustrated and New York Times versions. That is high praise coming from me.


Whole Wheat Chocolate Chip Cookies
adapted from Good to the Grain


3 cups whole wheat flour
1 1/2 teaspoons baking powder
1 teaspoon baking soda
1 1/2 teaspoons salt
8 ounces (2 sticks) cold unsalted butter cut into several pieces
1 cup palm sugar (or dark brown sugar)
1 cup granulated sugar
2 eggs
2 teaspoons vanilla extract
8 ounces bittersweet chocolate cut into 1/4" - 1/2" pieces


Preheat oven to 350. Line baking sheet with parchment. Combine flour, baking powder, baking soda and salt in a medium sized bowl, set aside. In the bowl of a stand mixer fitted with the paddle attachment, beat sugars and butter on low speed until just blended, about 2 minutes. Add the eggs one at a time, mixing until just combined after each addition. Stir in vanilla. Add dry ingredients, and mix on low speed until flour is barely combined. Stir in chocolate chunks. Form dough into balls about 1.5 ounces each, place on baking sheet 2 inches apart. Bake for 16-20 minutes, until the cookies have spread and cracked, the tops are dry and have browned a bit. Cool on baking sheet.

Thursday, May 13, 2010

Rhubarb Upside Down Cake for My Dad's Birthday


Growing up, I used to snack on the rhubarb that grew plentifully in my Iowa backyard. I had quite the affinity for sour things back then, and since I loved raw rhubarb so much it seemed incredibly strange to me to see it in things like pies. Especially when paired with strawberries. Frankly, I found it repulsive. It wasn't until last spring that I ever tried rhubarb in a baked good, and I couldn't have been more wrong about it. I have become obsessed.


I've been picking up hefty bunches of rhubarb every Saturday for the last few weeks, ever since its first appearance at the farmer's market. I've made a few galettes with it - which I haven't posted because they disappeared too quickly! - but decided to branch out this week, so I did a little rhubarb research. I found several recipes I wanted to try - I'll have to double up on my rhubarb purchases to make everything before the season is over - starting with this cake; a perfect choice, since today is my dad's birthday. He still lives in Iowa, so he won't get to taste his birthday cake, but he can at least enjoy looking at it. Actually, I'm not sure if that's nice or just torture...


I've made so many upside down cakes in the last year, and am always excited to find a new and fantastic recipe for one. I love the concept of them, and they are always beautiful and delicious. I love the way the fruit of choice is completely transformed by their long stint of being cooked in sugar and butter. In the case of rhubarb, it becomes tender and buttery with a sweet and wonderful zing, melded with a light caramel flavor. There is no lip-puckering, mouth-watering sour punch that is so often associated with rhubarb.


The cake itself is dense and moist and quite sturdy, with a tight crumb and a light and subtle tang from the buttermilk in the batter. Can you see the flecks of orange zest in the above photo? Who knew that orange and rhubarb were a match made in heaven???


The thing that ties this cake together, and makes it really superb is the crumb bottom. It is a simple crumb topping that is sprinkled on top of the batter before baking, but when you invert the cake, it becomes a crunchy base for the cake. I love having textural differences in my desserts, I don't like eating things that are just soft and mushy. They're too, well, soft and mushy. The crumb bottom completely solves that problem, and adds such a delicious dimension, I'll be adding it to all of my upside down cakes from now on!


In addition to the way this cake tastes, I love the way it looks. That's the great thing about upside down cakes - they need no adornment once they come out of the oven! This recipe has you cut the rhubarb in long pieces - about 3 inches long - and lay them in the pan all going in the same direction. The result is a beautiful pink and green design that looks almost like an abstract watercolor painting. Almost too pretty to eat! Though that didn't stop me from having a slice for (second) breakfast...

Happy birthday, Dad!


Rhubarb Upside Down Cake
adapted from Martha Stewart


For the Crumb Topping
4 tablespoons unsalted butter, melted
1/2 cup white wheat flour
1/4 cup granulated sugar
1/4 teaspoon salt

For the Cake
1 pound firm rhubarb stalks, ends trimmed and cut at a very sharp angle into 3 inch long pieces
1 3/4 cups granulated sugar, divided
1 1/2 sticks unsalted butter, softened, divided
1 1/2 cups white wheat flour
1 1/2 teaspoons baking powder
1 1/2 teaspoons salt
freshly grated zest from one medium-sized orange
1 tablespoon freshly squeezed orange juice
2 large eggs
1 cup buttermilk

Preheat oven to 350. Line bottom of 9 inch spring form cake pan with parchment, butter sides of pan and parchment, dot bottom of pan with 4 tablespoons (1/2 stick) of the butter, set aside.

Make Crumb Topping
Combine melted butter, flour, sugar and salt in a small bowl and stir until combined. Refrigerate until needed.

Make Cake
In a medium sized bowl, toss rhubarb with 3/4 cup of the sugar. Set aside. In another medium sized bowl, combine flour, baking powder and salt, set aside. In the bowl of a stand mixer fitted with the paddle attachment, beat remaining stick of butter and cup of sugar until light and fluffy. Add eggs one at a time, beating well after each addition. Add orange zest and juice and beat to combine. Add flour mixture in 3 additions, alternating with buttermilk in 2 additions, mixing until just combined. Toss rhubarb one more time, then lay pieces in pan as closely together as you can without overlapping too much. Lay them in rows all going in the same direction. Pour remaining sugar from bowl over rhubarb. Pour batter in pan, smoothing the top, then sprinkle crumb mixture over batter as evenly as you can, making crumbs of all different sizes. Bake for about an hour, or until a tester inserted intp center of cake comes out clean. Cool in pan for 10 minutes, then run a sharp knife around the edge of the cake, and invert onto a cooling rack to cool completely - don't invert onto serving plate here, or your beautiful, crunchy crumbs will become soggy, and we can't have that, can we?!


Tuesday, May 11, 2010

Spelt Olive Oil Cake with Chocolate Chunks


Ever since I got the book Good to the Grain - from which I baked these cookies last week - I haven't been able to get this cake out of my head. It is so unusual, so unpredictable, so humble, yet so sophisticated. It was curiosity that made me bake it the first time, but it is the sheer deliciousness of this cake that will keep me coming back to this recipe for years to come.


It doesn't look like much, but it has a little secret; the thing that sets this cake apart. What is it, you ask? Rosemary. Am I the last person on the planet to bake a dessert with rosemary? I was skeptical, I admit, but after eating this cake I can't believe I waited so long.

I was shocked and amazed at how seamlessly rosemary fit into this cake. Though I haven't baked with rosemary before, this wasn't my entry into herbal desserts. I made basil ice cream last summer and was less than thrilled about it. Because of that experience, I definitely had my doubts going into this cake, but I shouldn't have worried. It is spectacular.


This is a cake that can follow a fancy meal just as easily as it can be an afternoon snack. It has more dimension of flavor than almost anything I can remember eating. Though foods containing both olive oil and rosemary are, more often than not, savory, they make perfect sense in this cake. Really, this is the most surprising thing I've ever made. Each bite I take is new, and transportive and utterly delightful.


There isn't a lot of sugar in this cake, so the sweetness is subtle. It has the perfect quantity of bittersweet chocolate, whose richness and bitterness offset all of the other ingredients beautifully. I couldn't detect the taste of the spelt at all, but chocolate and rosemary are fairly strong flavors to compete with. The crumb of this cake is fluffy and soft and fine and moist, and it has a firm crust. It isn't the prettiest cake around - actually, it kept reminding me of another wonderful though entirely different cake - but I guarantee it can hold its own in the taste department against most anything else.


Oh, and if I haven't convinced you yet, it has minimal ingredients and is mixed up by hand in mere minutes. Make this cake. Make this cake, make this cake, make this cake.


Spelt Olive Oil Cake with Chocolate Chunks
adapted from Good to the Grain by Kim Boyce

3/4 cup white spelt flour
1 1/2 cups white wheat flour
3/4 cup granulated sugar
1 1/2 teaspoons baking powder
3/4 teaspoon salt
3 eggs
1 cup olive oil
3/4 cup buttermilk
1 1/2 tablespoons finely chopped fresh rosemary
5 ounces bittersweet chocolate, roughly chopped


Preheat oven to 350. Butter and flour a 9 inch spring form cake pan. In a large bowl, combine flours, sugar, baking powder and salt, set aside. In a medium sized bowl, whisk eggs thoroughly. Add olive oil, buttermilk and rosemary and whisk well to combine. Pour wet ingredients into dry ingredients, and whisk until just combined. Stir in chocolate. Pour batter into prepared pan and smooth the top. Bake for about 40-55 minutes, or until evenly golden brown and tester inserted into center of cake comes out clean. Cool completely before slicing.


Saturday, May 8, 2010

Ginger Scones


If you're still looking for something special to make for your mom tomorrow, look no further. These are some seriously fantastic scones.

The recipe comes from Pastries from the La Brea Bakery, by Nancy Silverton. In the book, Nancy calls these the best selling scones in the bakery, and after making them I can see why.

Before I tell you any more, a disclaimer: my scones shouldn't have been as thin as they were. I contemplated not posting them until I could make them again, but they are too good to hold back for however long it will take me to get around to doing that. The reason they were so thin is that I made them on an incredibly hot day, and even though my butter started out frozen, within only 5 minutes out of the freezer it was melty. I should have refrigerated my biscuits after I cut them, but I was impatient - on the day I made them I also made 2 tarts, 2 kinds of cookies and ice cream, all in a 5 hour time span - so I popped them in the oven. Ah well...

These are cream scones, and as such are incredibly light and fluffy, studded with chewy bits of crystallized ginger, and flavored with lemon zest. The tops are dusted with sugar before baking, creating a crunchy sugar crust; a beautiful contrast to the soft interior. Can you imagine anything better? They are the most wonderful scones I've ever had; they are lovely in every way.


Ginger Scones
adapted from Pastries from the La Brea Bakery by Nancy Silverton

2 1/4 cups white whole wheat flour
1/3 cup granulated sugar + more for dusting
1 tablespoon baking powder
finely grated zest from one lemon
1 1/2 sticks (6 ounces) unsalted butter, cut into chunks and frozen
4 1/2 ounces crystallized ginger, chopped into 1/4 inch pieces
1/2 - 3/4 cup heavy cream + more for finishing

Preheat oven to 400. In a large bowl, combine flour, sugar and baking powder. Add butter, and using a pastry blender, cut it in until mixture resembles a coarse meal. Add zest and toss in with your fingers. Add 1/2 cup cream, stirring with a wooden spoon or tossing with your hands until it is incorporated. Do not overwork dough. If it seems too dry, add remaining 1/4 cup of cream. Turn dough out on a lightly floured board, knead a few times to form a cohesive ball, and pat into a disk about 3/4 inch thick. If dough seems soft, refrigerate for about 5 minutes. Cut dough into circles using a 3" biscuit cutter, and place them 1 inch apart on a parchment-lined baking sheet. Cut as closely together as you can, then re-form the scraps into a 3/4 inch disk, cut as many circles as you can, etc... until you have cut all of the dough. Again, if the dough seems soft, refrigerate for 5-10 minutes before baking. When ready to bake, brush tops of scones with cream, then dust with sugar. Bake for 12-16 minutes, until they crack and are a light golden brown.


Wednesday, May 5, 2010

Cashew Chocolate Chip Crisps


I was lucky enough to receive Claudia Fleming's The Last Course for Christmas. It is an incredibly beautiful book that is only available now through the North Fork Table & Inn website. It is pricey, but worth it. I've spent hours perusing the inventive recipes and sumptuous photographs. Everything looks amazing, each recipe meticulous, unexpected, familiar, inviting. I want to make it all.


To christen my book, I started with these cookies. It is well-documented that I love chocolate chip cookies. These are one of the most interesting chocolate chip cookie recipes I've come across, and I just had to give them a try.


They're called crisps, and Claudia describes them as being brittle, but mine weren't... I made my cookies larger than she specifies - heaping tablespoon of dough instead of a heaping teaspoon - which probably accounts for the difference. The texture was fairly standard as far as chocolate chip cookies go, though thinner than I usually prefer. That being said, I loved these cookies. To me they are a cross between a Florentine and a chocolate chip cookie - this is how they are forgiven for being on the thin side; since they aren't a traditional ccc, they don't undergo the typical ccc scrutiny. Though they don't fall short on any other fronts.

These cookies are chewy, crispy on the outside, contain milk and bittersweet chocolate, they're studded with toasted cashews and are finished with orange zest. They are magnificent.


Cashew Chocolate Chip Crisps
adapted from The Last Course by Claudia Fleming


2 1/2 cups toasted cashews
2 1/2 cups white wheat flour
1 teaspoon salt
1 cup unsalted butter, softened
1 1/4 cups palm sugar
1 1/4 cups granulated sugar
1 teaspoon vanilla extract
zest from 1 orange, finely grated
2 large eggs
1 3/4 teaspoons baking soda
1 teaspoon water
8 ounces bittersweet chocolate chunks
8 ounces milk chocolate chunks

Preheat oven to 325. Line a baking sheet with parchment. In a food processor, grind 1/2 cup of toasted cashews and 1 tablespoon flour to a fine meal. In a medium sized bowl, combine remaining flour, salt and the ground cashew/flour mixture. Coarsely chop the rest of the nuts. In the bowl of a stand mixer fitted with the paddle attachment, beat butter and sugars until creamy. Add vanilla and zest, beat until well combined. Add eggs one at a time, beating for a minute after each addition. In a small bowl, dissolve baking soda in water and add it to bowl of the stand mixer. Beat until combined. Add flour mixture in two batches, mixing until just combined. Stir in chopped chocolate and cashews. Drop heaping tablespoons of dough onto baking sheet. Bake for about 18 minutes, until golden brown all over. Cool on baking sheet.


Tuesday, May 4, 2010

TWD: Burnt Palm Sugar Ice Cream


It has been way too long since I've made ice cream. Every time I make it, I wonder why I don't do it more often, it's really so easy! I was really happy that the TWD bakers were tasked to churn some this week, because it forced me to pull out my ice cream maker for the first time in a very long time.

This is basically a caramel ice cream. First you make a simple caramel out of sugar and water, then add the rest of the ingredients to the pan, resulting in your ice cream base. Couldn't be easier!


This is a delicious, rich, deeply flavored creamy treat. One that even my little ones got to enjoy, since I used palm sugar in place of cane sugar.


Thanks so much to Becky of Project Domestication for this fun pick, the recipe can be found on her blog.

Also, my business is having a great giveaway on our Facebook page, enter here!

Sunday, May 2, 2010

Quinoa Cookies


There has been quite a bit of buzz lately about the new baking book Good to the Grain by Kim Boyce. As soon as I heard about the book I bought a copy, I knew it would be right up my alley. I was right.

Good to the Grain is all about baking with whole grains, and each chapter is devoted to a different one; whole wheat, barley, amaranth, quinoa and more. Though I eat a variety of grains on a regular basis, I have barely dabbled with their flours in baking. I've been wanting to incorporate new flours into my baking for some time, but was unsure of how to begin - they all have different textures and flavors and I only have so much time for experimentation!

When flipping through the book for the first time, one of the recipes that immediately jumped out at me was these cookies. I love quinoa. My boys and I eat in on a nearly daily basis. Did you know that it is a complete protein? One of the many things that makes it a regular in my home.

I had no idea what to expect from these cookies. They use not only quinoa flour, but quinoa flakes, plus a hefty 2 teaspoons of nutmeg. Unusual, to say the least.

They came out of the oven much being more attractive than I had anticipated; a crackled top, slightly crispy edges, soft on the inside, flecked all over with the white quinoa flakes. The quinoa flavor is much more subtle than I had hoped - it was rather overpowered by the nutmeg. If I made these again, I would definitely tone the nutmeg down. If you're not sure about your feelings on quinoa, however, you may want to leave the nutmeg as is. I suspect it helps ease people in to the flavor of quinoa which some find to be an acquired taste.

I really enjoyed these cookies, and was surprised at how effortlessly the quinoa fit in. Though I did hope the flavor would be a little more outstanding, though it was there, and very tasty. I used palm sugar as my sweetener, which was a lovely complement to the quinoa and nutmeg. I found them to be a tad on the salty side - which is not something I ever say, I love salty - so you may want to use 1/2 teaspoon less. It just occurred to me that these would also be fantastic as thumbprints, filled with jam or even a nut butter - I'll have to try them that way with some of my remaining dough.

*** Update *** I tasted a cookie on its second day and the nutmeg had mellowed considerably. If you're going to serve the cookies immediately, I would still recommend using a little less nutmeg, but if you think they'll be around a couple of days you may want to leave it as is.


Quinoa Cookies
adapted from Good to the Grain by Kim Boyce


2 1/2 cups white whole wheat flour
1/2 cup quinoa flour
2 teaspoons kosher salt
1 1/2 teaspoons baking powder
1 teaspoon baking soda
2 teaspoons freshly grated nutmeg
8 ounces cold unsalted butter, cut into small pieces
2 cups palm sugar
2 tablespoons molasses (not blackstrap)
2 eggs
2 teaspoons vanilla extract
1 1/2 cups whole oats
1 cup quinoa flakes + 3/4 cup for rolling

Preheat oven to 350. Line baking sheet with parchment. Combine flours, baking powder, baking soda, salt and nutmeg in a medium bowl, set aside. In the bowl of a stand mixer fitted with the paddle attachment, combine butter and sugar and mix on low until just blended, about 2 minutes. Add the eggs one at a time, mixing for about a minute after each addition. Stir in molasses and vanilla. Add flour mixture and mix on low until flour is barely combined. Add oats and one cup of quinoa flakes mixing until just combined. Don't be concerned if the dough seems crumbly, it will come together when you form it into balls. Place remaining 3/4 cup quinoa flakes in shallow bowl. Form dough into balls about 3 tablespoons in size and roll in flakes to cover them completely. Place balls in baking sheet about 3 inches apart. Bake for about 5-18 minutes, until cookies have spread, cracked and are an even golden brown. Let cool on baking sheet.


Saturday, May 1, 2010

Le Creuset Winner!!!


The winner of my Le Creuset giveaway is Debbie in Memphis!!! Congratulations, Debbie! Email your shipping address to blueridgebaker@gmail.com to claim your prize!

Thanks so much to everyone who entered!


Related Posts with Thumbnails

ShareThis