Monday, November 30, 2009

Chocolate No-Roll Crust for Pies & Tarts


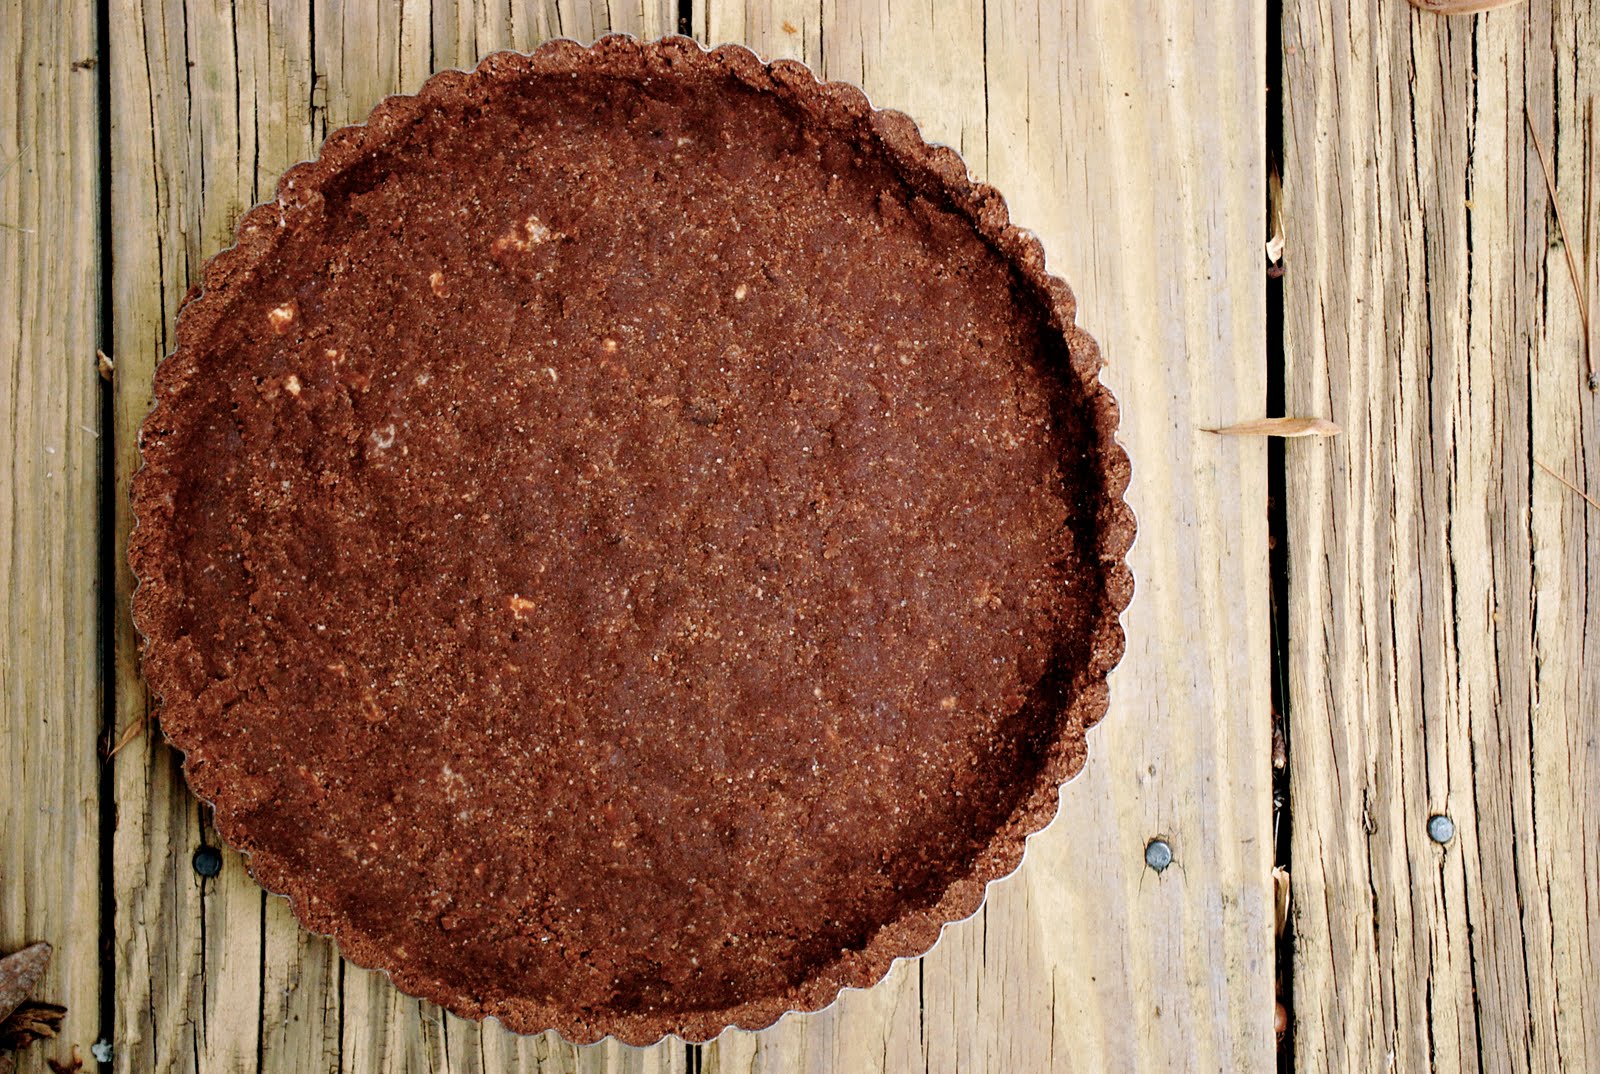
Today is my uncle's birthday. He requested a chocolate peanut butter tart for the occasion, which I was happy to provide him with. As I was planning his tart, I was thinking about the crust I was going to make. I didn't want to go with a traditional tart crust. I wanted something more like a cookie-crust, but not as sweet. I immediately thought of the no-roll crust I originally saw on Joy the Baker - which I have already done two adaptations of - and wondering if I could figure out a chocolate version.

I decided to stick with partial whole wheat flour, which I wanted for it's texture and earthiness. I added sugar to this crust, which I omitted from the other two, and obviously I added cocoa powder. It worked out perfectly on the first try! I was so happy with this crust, I had to give it its own post (though I will post the tart I used it for tomorrow). This crust has a wonderful chocolate flavor that is just sweet enough, and the the texture is sandy and crumbly (though it stays together beautifully). It was everything I wanted it to be. It is a perfect alternative to a cookie crust, and nearly as easy to make. This one is a keeper!


Whole Wheat Chocolate No-Roll Crust

3/4 cup + 1 tablespoon whole wheat flour
1/2 cup + 1 tablespoon unbleached white flour
1/4 cup cocoa powder
3/4 teaspoon salt
4 tablespoons + 1 teaspoon sugar
1/4 teaspoon baking powder
1 tablespoon cream cheese, softened
4 tablespoons butter cut into small pieces and frozen
4 tablespoons ghee, melted and cooled
2 tablespoons cold heavy cream

In a medium sized bowl, combine flours, cocoa powder, salt, sugar and baking powder. Set aside. Add cream cheese and butter and using a pastry blender, cut them in until well incorporated and there are butter bits of various sizes, though none terribly large. Combine heavy cream and ghee and add a little at a time to the flour mixture, tossing with your fingers as you add it. When all of the liquid has been added, use your hands to squeeze all of the ingredients to form a dough. It is okay if it is crumbly, though you want to make sure all of the dry ingredients have been moistened. Dump dough into well-buttered 9" tart pan with a removable bottom (or a 9" pie pan), and press in evenly. Place crust in freezer for at least 30 minutes, and preheat oven to 375. To blind bake, press a piece of aluminum foil over the crust and bake covered for 10 minutes. Remove foil and bake for another 15, or until crust feels slightly firm to the touch. Let crust cool completely before filling.


Sunday, November 29, 2009

SMS: Raised Waffles with Warm Palm Sugar Bananas


I have not been a good SMSer lately, and I apologize to my fellow bakers! I skipped last week, and then I went and skipped this week's recipe, plus I've been a terrible commenter. At least a new year is coming up and I can resolve to be better...

In the meantime, I have some fantastic waffles for you. (Which were actually the pick for last week, so I am making an attempt to catch up.)

I received a wonderful cast iron waffle maker for Mother's Day this year, though had yet to make any waffles with it, because it required seasoning, and I hadn't gotten around to it. I was so excited to finally pull it out and put in the work to make it useable, because it made the best waffles I have ever eaten. I'm not sure how much of that can be attributed to the waffle iron and how much to the recipe, but let me tell you, these were fantastic.

The texture was amazing. I have never had a waffle that was so crispy on the outside, and so tender on the inside. No sogginess here, even when drenched in maple syrup and warm bananas. We folded ours over to eat them like a sandwich, with all of the bananas and maple syrup on the inside. Oh my. I was so glad I only made a half recipe, so that 2 waffles was my limit...

I made a lot of changes in the recipe: I used instant yeast, I doubled the amount of nutmeg and added 1/2 teaspoon cinnamon (remember, this was a half recipe), added 1 teaspoon vanilla extract, used 3 teaspoons of palm sugar, and I was out of eggs so I used 2 tablespoons of tapioca powder as an egg substitute.

The banana topping was divine. I used palm sugar in place of brown sugar, and added about 1/2 teaspoon vanilla extract. I didn't put the maple syrup in the topping, but poured it on my waffles separately, and it was wonderful.

This was the first raised waffle I have ever had, and I can certainly say it won't be the last.

This recipe was chosen by Lauren of Fried Pickles and Ice Cream. Sorry I was a little late with these, Lauren! You can find the recipe on her blog.


Friday, November 27, 2009

French Silk Pie


When I was young, a holiday was never a holiday without a French Silk Pie. It was one of my grandmother's specialties. She passed away when I was 9, and sadly, I never learned how to make it from her. After she passed away, we had many Thanksgivings and Christmases without this delicious dessert, until a few years ago when my aunt picked up the slack. This year I was in charge of the Thanksgiving sweet treats, so it was my turn to test my French Silk Pie making skills.

This is an amazing dessert for so many reasons. The crust is perfect - flaky and buttery. The pie is light and airy and melts in your mouth, it is rich and deeply chocolate-y, it looks like it took hours to make but it really only takes a matter of minutes (not including the time it takes to make the crust). It does contain raw eggs, but I think we can look past that, don't you? I mean if I can do it, so can you. I am not at all a fan of eggs, and this is far and away the only way you could ever get me to eat raw ones. I'm working on a version with cooked eggs - when I figure it out, I'll let you know. Until then, this is just too delicious to pass up because of a couple of raw eggs, so I hope you'll give it a try.


French Silk Pie

All-Butter Pie Crust
adapted from Good for Almost Everything Pie Crust by Dorie Greenspan

makes a 9" double crust

3 cups unbleached white flour
1 1/2 teaspoons salt
13 ounces (3 sticks + 2 tablespoons) unsalted butter, cut into small pieces and frozen
1/2 cup ice water

Combine flour and salt. Using a pastry blender, cut in butter until it is well-distributed. There should be pieces of butter in varying sizes. Add the water a little at a time, working the dough with your fingers to incorporate it. Add as much of the water as you need for the dough to form a ball. If you need a little extra water, go ahead and add it. When the dough has come together, divide it into two equal pieces. For a single crust, roll out one piece of dough on a well-floured board. Place in buttered 9" pie plate, trim the edges, and bake for about 25 minutes, or until golden brown. Let crust cool completely before filling.


Filling

4 oz best quality semisweet chocolate
1/2 cup unsalted butter, softened
1/4 cup sugar
1 teaspoon vanilla extract
2 eggs
1/2 cup heavy whipping cream + more for topping

In the bowl of a stand mixer, cream butter. After about 2 minutes, add the sugar and mix until light and fluffy. Add vanilla. Add eggs one at a time, beating for 1 minute after each addition. Meanwhile, melt chocolate in a heat-proof bowl set over a pan of simmering water. When chocolate is fluid, slowly add it to mixer in a thin stream. When all of the chocolate is incorporated, pour heavy cream in a thin stream and whip on high for about 2 minutes. Spoon filling into crust, and refrigerate for at least an hour before serving.

When ready to serve, remove pie from fridge and top with freshly whipped heavy cream that has been lightly sweetened with agave.


Buttermilk Fantails


I saw these rolls on Tracey's blog a while back, and kept them filed away in my memory, just waiting for an occasion to make them. Thanksgiving was the perfect excuse. I made these along with a flourless chocolate cake, sweet potato pie, French silk pie (post coming tomorrow) and cranberry sauce.

I love the look of these rolls, so festive, so fancy! The technique for making them is so simple, but the result is just stunning. They're also really fun to eat, as you can peel them away layer by layer. The way they're formed also gives a variety of textures which I loved - lots of crispy edges. The interior is fluffy and light and soft.

I was tempted to put some whole grain flour in these, or some fresh cut herbs, but in the end I made them basically as written. I thought the flavor of the rolls could be improved upon, so I wish I had done either (or both) of those additions. I will definitely be making these again, adding my own little tweaks.


Buttermilk Fantails
adapted from Gourmet, February 2009


7 tablespoons of butter, melted
2 teaspoons instant yeast
1/4 cup warm water
3 cups unbleached white flour
1 1/2 teaspoons salt
1/4-3/4 cup buttermilk

In the bowl of a stand mixer fitted with the paddle attachment, combine water, yeast, flour, salt and 6 tablespoons of melted butter. With mixer on low, add buttermilk in a thin stream until all dry ingredients are moistened and a soft dough forms. Switch to dough hook, and mix on medium speed until dough is smooth and elastic - about 5-7 minutes - adding more buttermilk or flour to achieve the proper consistency. Form dough into a ball. Place in an oiled bowl, rotating to coat the dough. Cover bowl with plastic wrap, and let it rise in a warm place until doubled in size. About 1 1/2 - 2 hours. While dough is rising, butter cups of a 12-cup muffin pan. When dough has risen, punch it down then divide it in two equal pieces. While working with the first piece, keep the second covered with plastic. Place first ball of dough on floured board, and roll it into a square about 12" x12" and 1/8 inch thick. Brush dough with half of the remaining melted butter. Cut the dough into six strips, about 2" wide. Stack all 6 strips on top of each other, butter side up. Cut stack into 6 equal pieces. Place each piece in a muffin cup, then peel way the layers so that they fan outward. Repeat with second ball of dough. Cover the rolls with a kitchen towel, and leave them in a warm place to rise for 1 - 1 1/2 hours, or until doubled in size - the rolls should fill the muffin cups. When the rolls are close to the end of their second rise, preheat oven to 375. Bake rolls for 20-25 minutes, or until they are golden brown.

Tracey has step-by-step photos on her blog if you want to take a look at how the rolls are formed.


Wednesday, November 25, 2009

Broccoli + Kale Pizza on a Quick and Easy Pizza Crust


Whoa! What is that?! Something savory? Something that could be considered *a meal*?! On my blog?! Okay, are you over your shock yet? Let's get to this pizza.

I saw the crust recipe months ago on The Way the Cookie Crumbles, and I've made it several times, though never took photos of it. I made it again today, after staring at the contents of my fridge and searching for inspiration, and knew I couldn't hold out on you any longer.

This is the perfect last-minute meal. It can be ready in 30 minutes from start to finish. That's right, homemade pizza in 30 minutes. So, if you're burned out from Thanksgiving cooking/baking and need a great meal today that requires little effort, this is the recipe for you.

It is a delicious crust; crispy around the edges, soft on the inside, buttery, flaky. It is like a thin crispy biscuit. This is definitely a recipe that you want to have in your arsenal.


Quick Baking Powder Pizza Dough
adapted from Vegetarian Classics by Jeanne Lemlin

2 1/2 cups unbleached white flour (plus more for dusting)
1 1/2 teaspoons baking powder
1/2 teaspoon salt
4 tablespoons cold unsalted butter, cut into small pieces
1 cup whole milk
cornmeal for sprinkling

Preheat oven to 500. Place baking stone on center rack. Combine flour, baking soda and salt in a large bowl. Add butter, and using a pastry blender, incorporate butter until mixture resembles coarse meal. Add milk slowly, only using as much as you need for all of the flour to be moistened. Knead 2 or 3 times in the bowl until dough forms a ball. Divide dough into 2 pieces for 2 12"pizzas or 4 for pieces for 4 8" pizzas. Sprinkle pizza peel with cornmeal. Dust ball of dough with flour, place on peel and roll out with floured rolling pin. The dough will puff in the oven, so roll it out fairly thin (1/8" or so) for the best results. Place in fridge while you prepare your toppings.

Broccoli + Kale Pizza

1 small bunch of broccoli (about 1/2 pound)
1/2 bunch of kale (about 6 leaves)
2 teaspoons olive oil
salt to taste
1 cup grated sharp white cheddar
1/4 cup fresh grated parmesan

Pour olive oil into skillet and heat over medium flame. Add salt. Cut broccoli into small pieces. Chiffonade kale. Add broccoli to skillet, stirring to coat with oil. After about 2 minutes, add kale, stirring until coated with oil. Cook for another 2 minutes, or until broccoli and kale are almost cooked.

Top crust with veggies. Cover in cheddar, then parmesan. Transfer from pizza peel to baking stone. Bake for 8-10 minutes, or until edges are nicely browned and crispy.


Tuesday, November 24, 2009

Dulce de Leche


Dulce de Leche is everywhere these days; in brownies, on ice cream, in ice cream, as a filling for cookies, on cake - you name it. Unfortunately, though the store I shop at (an enormous locally-owned health food store) does sell pre-made Dulce de Leche, they don't sell organic Dulce de Leche. Though I don't know if this is exactly a downside, as homemade is always better.

I finally bit the bullet a few weeks ago and bought a can of sweetened condensed milk to make my own. When I saw that ever reliable David Lebovitz had a recipe on his site for it, I tried it out. It was simple enough - pour can of sweetened condensed milk into a glass pie plate, place that in a water bath, cover pie plate with aluminum foil and leave it in the oven at 425 for 1 - 1 1/4 hours. Well, the result was tasty, but it wasn't smooth. The final instruction was to whisk until smooth, but I could have whisked until my arm fell off and it wouldn't have made a difference. It had chunks. Small chunks, but chunks nonetheless. It was also a little chalky. I was slightly horrified that I was unable to execute such simple instructions...

A couple of weeks went by, and I was sent this wonderful box of goodies from an acquaintance at Heavenly Organics (as I was doing a tasting for them in a local store). Including sweetened condensed milk. I was determined to try again. With a different technique. The result was pure heaven. Smooth, rich, creamy Dulce de Leche. Lick-the-bowl-clean Dulce de Leche. I don't think there is anything it wouldn't be delicious on. The perfect addition to your holiday table.

You'll be amazed at how easy it is to make.


Dulce de Leche

Pour can of sweetened condensed milk into a heat-proof bowl, and place over simmering water. Leave it for about 1 1/2 hours, stirring every 30 minutes or so with a whisk. Check the water periodically, adding more when necessary. The longer you leave it, the darker and thicker it will become. If you want it to be a sauce, pull it off the heat at around 1 1/2 hours. For thicker, scoop-able Dulce de Leche, it will be more like 3 hours. When your Dulce de Leche has reached your desired consistency, whisk it until smooth (though it should be nearly smooth already). Remember, it will thicken some as it cools, so keep this in mind when deciding how long to cook it for.


Monday, November 23, 2009

Sweet Potato Pie


This is another one for Eileen, who requested some diabetic-friendly holiday pie recipes. She requested pumpkin pie, but I decided to go with sweet potato, because they are naturally sweeter than pumpkin, so you don't need to add much additional sweetener to the pie.

I looked at several recipes online, but in the end decided to go my own way.

This is an unbelievable pie. It is so much better than any pumpkin pie I've ever had, and I really love pumpkin pie. It is smooth and creamy, flavored with warm Fall spices, just sweet enough, delicate yet rustic, and oh so easy to make. The scent of it is enough to make you want to devour the whole thing, and when you actually take a bite you're done for.


Most recipes for sweet potato pie will have you boil the sweets before mashing them and then add lots of sugar. That seems silly to me when you can bake them, enhancing their natural sweetness (not to mention their flavor).

I used a no-roll crust again to make this pie especially user-friendly, though I tweaked it a bit from the last time I used it and I think it is even more flavorful this way.

I made two mini pies this time around, but this is will certainly be sitting on my family's Thanksgiving table in full-size form.


Sweet Potato Pie with No-Roll Crust


No-Roll Whole Wheat Crust
adapted from Joy the Baker

1 cup whole wheat flour
1/2 cup unbleached white flour
3/4 teaspoon salt
1/8 teaspoon baking powder
1/4 cup butter, frozen
1/4 cup ghee*, melted
1 tablespoon cream cheese, softened
2 tablespoons cold milk

In a medium-sized bowl, whisk together flours, salt and baking powder. Using a box grater, grate the frozen butter into the dry ingredients. Add the cream cheese, and using your fingers, rub the butter and cream cheese into the flour mixture until they are well-incorporated, and there are butter bits of various sizes. Whisk milk and melted ghee together in a small bowl (it's okay if the ghee seizes and hardens) pour over flour/butter mixture. Toss together with a fork until all of the flour is moistened - it need not form a ball. Dump into a prepared pie plate and using your fingers, evenly press dough into the plate. Place in freezer while you make the filling. Preheat oven to 400.

*Ghee is clarified butter. It is incredibly easy to make, but if you don't have any, can't get any or don't want to make any, you can use any other mild-flavored oil.

Sweet Potato Filling

2 1/2 pounds sweet potatoes
1/4 cup palm sugar
1 cup heavy cream
1 teaspoon vanilla extract
1 teaspoon cinnamon
1 teaspoon freshly grated ginger
1/2 teaspoon freshly grated nutmeg
1/4 teaspoon salt
2 large eggs


Preheat oven to 400. Wash but do not peel sweet potatoes, and pierce them a few times with a fork. Place sweets directly on middle oven rack, with a baking sheet or a piece of aluminum foil on the rack below to catch any drips. Bake for about an hour, or until the sweet potato is very soft and the skin has become separated from the meat. Remove sweets to a rack to cool. When cool enough to handle, remove the skin (this should be quite easy) and place the sweet potatoes in a fine mesh sieve. They should have developed a sticky caramelized coating under the skin. Press through the sieve (fingers work well for this) and measure out 2 cups of it. It should be completely smooth, with no strings or clumps. Add palm sugar and spices, whisk until incorporated. Add heavy cream and whisk until smooth. At this point, you can taste the filling to see if you need to adjust anything. Keep in mind that it will be slightly diluted by the eggs that haven't been added yet, so all of the flavors should be a bit stronger at this point than you want them to be in the final product. Depending on the sweetness of your sweet potatoes (and your personal preferences) you may need to add a bit more palm sugar. I don't like terribly sweet desserts, so this was perfect for me. When everything is to your liking, add the eggs and whisk until smooth.

Pour filling into prepared pie crust, smooth the top and bake for 35-45 minutes, or until the filling puffs and is set in the center. You can test this by jiggling the pie plate, or by pressing on the top of the pie gently with your fingertips.


Saturday, November 21, 2009

Condensed Milk Pound Cake


I caught my first glimpse of this pound cake on Caitlin's blog, Engineer Baker. It caught my attention, and it remained in the back of my mind. Then Tracey made it, and it moved a little more to the front of my mind. Then, I was contacted by someone I grew up with, who works for a company based in my home town called Heavenly Organics. They produce very high quality, incredibly delicious USDA certified organic sugar, honey, and sweetened condensed milk, all of which I highly recommend. He called to ask if I might know anyone in Asheville who would like to bake some treats with his company's products, then do a tasting at a local foods store, and get paid for it. Did I know someone!

A week later I received a box in the mail with 4 cans of sweetened condensed milk, 2 bags of sugar and 6 jars of honey. If only the mailman brought me such things every day. Also included in the box were recipe cards for shortbread, pumpkin pie and coconut macaroons. I looked through the recipes, trying to decide what to make for my tasting. I love shortbread, so I tried that recipe first. And I severely disliked it. It was too greasy, and even after baking it for a full 15 minutes past the suggested baking time, it was chewy. Not good. Not something I would serve anyone, certainly not something I would have admitted to making.

After my shortbread disappointment, I didn't trust the recipe cards I was sent, so I had to look for other treats that would showcase the ingredients Heavenly Organics makes. The condensed milk pound cake immediately came to mind.

Putting it together was a breeze. The recipe as written calls for a food processor, and believe it or not I don't have one. At least I don't have a large one. So I used my stand mixer and it worked perfectly. The batter was gorgeous - thick and glossy and smooth and creamy. I couldn't wait for the final result.

This pound cake is unbelievable. The crumb is tight, it is buttery without being greasy, it is not eggy tasting at all, the flavor of the sweetened condensed milk is not in your face, but it is there, and it is lovely. The edges of the cake are crunchy and almost candy-like. I cannot think of one thing about this pound cake that I don't like. There is no way I could change it to make it better. It is just wonderful.


Condensed Milk Pound Cake
adapted (in method) from The Sweet Spot: Asian Inspired Desserts by Pichet Ong & Genevieve Ko

2 sticks (8oz) unsalted butter, softened
1 1/3 cups (7oz) unbleached white flour
3/4 teaspoon baking powder
1/2 cup (3 3/4 oz) sugar
2 teaspoons vanilla extract
1/2 teaspoon salt
3/4 cup (8 1/2 oz) sweetened condensed milk
3 large eggs

Preheat oven to 325. Butter and flour a 9" x 5" loaf pan. In a small bowl, combine flour and baking powder, set aside. In the bowl of a stand mixer, cream butter, sugar and salt until light and fluffy, about 2 minutes. Add condensed milk and mix until just combined. Add the dry ingredients, mixing just until all of the flour disappears into the mixture. Add eggs, mixing until combined. Stir in vanilla extract. Spoon batter into prepared pan, smoothing the top with a spatula. Bake for 70 - 80 minutes, or until a thin knife inserted into the center comes out clean. If the top of your pound cake looks like it's browning too quickly, place a foil tent over it for the remainder of its time in the oven.

Please go make this now, you won't be sorry you did.

I should also tell you about the tasting! I took this pound cake, coconut macaroons from the recipe provided by Heavenly Organics (they were delicious, but I took no pictures, so I'll have to make them again so I can share them with you), Twice Baked Shortbread from Pure Dessert by Alice Medrich (basically this shortbread without the brown butter), and a bowl of homemade dulce de leche which I will photograph and post soon. It was a lot of fun, and I'm excited to be doing another one in a few days.

Condensed Milk on Foodista

Friday, November 20, 2009

Cranberry-Ginger Streusel Pie


I received an email from a reader a few days ago, asking me to post diabetic-friendly holiday-appropriate pie recipes. She asked specifically for pumpkin and pecan - which I'll get to in a few days - but first, I have this one.

This pie is about as healthy as a pie can be. It is sweetened solely with palm sugar, and uses nothing but whole wheat flour. There is a minimum amount of butter, as well as a little olive oil.

It is a snap to put together, helped out by the fact that it uses a no-roll crust. Nothing to be afraid of here!

Although the filling is almost entirely cranberries, it is not overly tart. The combination of palm sugar, vanilla extract, water and fresh ginger forms a delightful sweet, slightly spicy thin jelly-type layer below the cranberries which was a delightful surprise when taking my first bite. If you want to, other fruits can certainly be combined with the cranberries to sweeten it even more.

I was so impressed with the texture of this crust. It certainly isn't the same as a traditional crust that is laden with butter, but it has a charm all its own. It is so quick and easy to make, it cuts perfectly into beautiful clean slices, and is lovely and tender. It has a definite wheat flavor, and if that doesn't appeal to you, you could certainly do a combination of whole wheat and white. I really liked the earthiness of the wheat, and thought it paired nicely with the cranberries and ginger.

I hope this works for you, Eileen, more pies to come!


Cranberry-Ginger Streusel Pie


Before beginning, preheat oven to 350 and butter a 9" pie plate.


Streusel Topping

1/4 cup + 2 tablespoons whole wheat flour
2 1/2 tablespoons butter, melted and cooled
1/4 cup palm sugar
1/4 teaspoon salt

Combine flour, palm sugar and salt in small bowl. Add butter and toss with fingers until all flour is moistened and crumbs have formed. Refrigerate until the rest of the pie is assembled.


No-Roll Whole Wheat Crust
adapted from Joy the Baker

1 1/2 cups whole wheat flour
3/4 teaspoon salt
1/8 teaspoon baking powder
1/4 cup butter, frozen
1/4 cup olive oil
1 tablespoon cream cheese, softened
2 tablespoons cold milk

In a medium-sized bowl, whisk together flour, salt and baking powder. Using a box grater, grate the frozen butter into the dry ingredients. Add the cream cheese, and using your fingers, rub the butter and cream cheese into the flour mixture until they are well-incorporated, and there are butter bits of various sizes. Whisk milk and olive oil together in a small bowl and pour over flour/butter mixture. Toss together with a fork until all of the flour is moistened - it need not form a ball. Dump into a prepared pie plate and using your fingers, evenly press dough into the plate. Place in freezer while you make the filling.


Cranberry-Ginger Filling

4 cups fresh or frozen cranberries (If using frozen, work quickly so they don't defrost)
1/2 cup palm sugar
1 tablespoon grated fresh ginger
2 teaspoons vanilla extract
2 tablespoons water

Combine all ingredients in a medium-sized bowl, and toss with fingers.


Finishing the pie:

Remove crust from freezer. Pour cranberry filling into crust. Scatter streusel topping evenly, ensuring that there are crumbs of various sizes throughout.

Bake pie for about an hour, or until the cranberry juices are released and they have thickened. The top layer of cranberries will keep their shape, but should give way when pressed. If topping looks like it is browning too quickly, place a foil tent over the pie. Let pie cool for at least an hour before cutting.


Thursday, November 19, 2009

BBA Challenge: Whole Wheat English Muffins


I've always enjoyed English Muffins, but they aren't something I ever remember to buy. I was really excited to make my own for the BBA Challenge. They looked simple enough, and they are cooked in a skillet before being transferred to the oven to bake through which looked like a lot of fun to do.

English Muffins were supposed to have been posted oh, I don't know, a month or so ago... I made them on schedule, but they were a total flop. I felt defeated and deflated and hadn't made bread since. Then I saw Nancy's post on her English Muffins and I was inspired to try again.

Everything that went wrong the first time - they were huge and round like rolls, they burned on both sides in the skillet, they had no flavor - was remedied this time around. To combat the lack of flavor, I used 5oz whole wheat bread flour and 5oz unbleached white flour. This added a wonderful complexity that was earthy, a little sweet, and very hearty. Once I put my risen dough balls into the skillet, I pressed them down with a spatula to flatten them. I may have lost my nooks and crannies that are typical of English Muffins, but I much preferred them this way. I think I may have had my burner on too high the first time around, hence the burning, so I was very careful to have a rather low flame for their time in the pan. I also used salted butter instead of oil, and let me tell you what a brilliant idea that was! It added just a hint of saltiness, that played so well off of the crunchy caramelized spots on the crust. So, so good.

I am very pleased to say that I really look forward to making these again. Though I'll probably double the batch and freeze some, because they are already gone (and were only baked last night!).

The recipe for these English Muffins can be found in The Bread Baker's Apprentice by Peter Reinhart. A must-have book if you enjoy baking bread at home.


Wednesday, November 18, 2009

Chocolate Biscotti


The other day the mood struck to make biscotti. I'm not really sure why, it isn't something that I particularly love and I never buy it. But I wanted to make it. Biscotti often has nuts and/or dried fruit in it, and I had neither, so I needed a recipe that contained items I did have. Namely, chocolate.

I took to the internet to find a recipe. I started with one that had gotten favorable review on recipezaar.com, including one from someone who said they made the biscotti and sold it at a local Italian restaurant. That biscotti was awful. The dough was so sticky I could hardly form it into logs, and when it was baked it was unpleasantly crumbly had had a very eggy flavor and was not terribly chocolatey - and it contained 3/4 cup cocoa powder and 6 oz chopped chocolate. They were inedible. This is not that biscotti.

After my biscotti flop, I turned to Dorie. Why I didn't go to her first, I have no idea. I found exactly what I was looking for in Baking From My Home to Yours.

These are wonderful. They have a deep chocolate flavor which is accentuated by the addition of espresso powder. The coffee flavor is not predominate but it is there, and I loved that. If baked for the amount of time Dorie suggests, they are actually rather chewy on the inside but crunchy on the outside. I ate a few that way, then baked the rest for another 10 minutes so they would be more like a classic biscotti. Though crunchier, I actually think they lost some of their flavor in those extra 10 minutes, so next time I will stick to the instructions as written.

These are biscotti that I would buy, these are biscotti that I would crave, these are biscotti that I will make again.

Chocolate Biscotti
adapted from Baking From My Home to Yours by Dorie Greenspan

2 cups unbleached white flour
1/2 cup unsweetened cocoa powder
2 tablespoons instant espresso powder
3/4 teaspoon baking soda
1/2 teaspoon baking powder
1 teaspoon salt
6 tablespoons unsalted butter, softened
1 cup sugar
2 eggs, lightly beaten
1 teaspoon vanilla extract
4 ounces bittersweet chocolate, coarsely chopped

Preheat oven to 350. Line a baking sheet with parchment. Combine flour, cocoa, espresso powder, baking powder, baking soda and salt. Set aside. In the bowl of a stand mixer, beat butter and sugar until pale - about 2 minutes - the mixture may be crumbly. Scrape sides of bowl. Add eggs and vanilla and beat for another 2 minutes. Don't be concerned if the mixture looks curdled at this point. With the mixer on low, add the dry ingredients in 3 additions, mixing only until they disappear into the dough. Scrape sides of bowl. Stir in chopped chocolate. Divide dough into 2 equal pieces and form into logs about 12" long. Place logs on baking sheet and flatten logs so that they are about 2 inches wide and 1/2 inch thick. Bake logs for about 25 minutes, or until they feel slightly firm. The logs will spread and crack. Leaving the oven on, remove baking sheet and put it on a cooling rack for 20 minutes. Using a large serrated knife, cut each log diagonally into pieces about 1/2 inch wide. Carefully place these slices back on the baking sheet with a little space between them. If it helps, use a large, thin spatula for the transfer. Bake the cookies for 10* minutes and transfer to a rack to cool.

* If you like your biscotti crunchy, you may need to bake them for 5-10 minutes longer the second time

Tuesday, November 17, 2009

TWD: Sugar-Topped Molasses Spice Cookies


Around the time I started my blog, I was on the search for the perfect Ginger-Molasses Cookie. I never found it. Until now. I should have known it would be Dorie that would provide me with the recipe.

These cookies are unbelievable. They are crispy around the edges, chewy on the inside, complexly flavored with molasses, ginger, cinnamon, allspice, and black pepper.

I doubled the amount of cinnamon, allspice and black pepper, and added 1 teaspoon of ground ginger. The only other thing I might try is to up to black pepper - I couldn't really taste it, and I was longing for that kick. A peppery cookie is not what I would want on a regular basis, however, so as a general rule I'll stick to the recipe (basically) as Dorie wrote it.

I will make these cookies every chance I get. Birthdays, holidays, weekends, you name it.

Thanks so much to Pamela of Cookies with Boys for choosing this fantastic cookie recipe, which can be found on her blog.

I don't know what else to say about these, except go make them. Now.


Sunday, November 15, 2009

SMS: Butter Toffee Crunch


I was raised by a single mom. It was just the two of us, and I was fine with that. My parents divorced when I was very young, so I really have no memories of all of us being together.

When I was 10 my dad remarried. We lived in different states, so I didn't see my dad too often, but I loved going to visit him in Wisconsin. He would drive to Iowa (where I grew up) to pick me up and drive me back to Wisconsin. Sometimes on our drive I would sing entire musicals from start to finish - we had several hours to kill.

Once in Wisconsin, I actually spent a lot of time by myself. I was fine with that, too. I could always find a way to keep myself busy; drawing, making jewelry, hand-sewing a quilt, designing clothes, and making toffee.

I didn't use a recipe, I just tossed a lot of butter and sugar in a pan and cooked it for a long time. I didn't use a candy thermometer, and I didn't really know what I was doing - I was only 12 though, so cut me some slack - so sometimes it was crunchy, sometimes chewy with unmelted sugar crystals. I poured it into a buttered pan and when it cooled a bit, I slathered it in melted chocolate.

It has been at least 15 years since the last time I made my toffee, so imagine my delight when I read through this week's SMS pick, and found that it was very similar to my childhood concoction!

This version uses brown sugar and vanilla for depth of flavor and baking soda, which gives the toffee an airy texture.

Thankfully, I only made 1/4 of the recipe. Even 1/4 was a lot, and it is quite a tasty thing to nibble on every time I walk through the kitchen.

I used pecans instead of almonds, as that is what I had, but that was the only change I made.

The recipe calls for taking the butter, brown sugar and a little water up to 290 degrees, but had I done so, it would have been completely burned. Even at 280 it had slightly bitter burned flavor. Maybe my thermometer isn't accurate, I don't know... Other than that, this was a really easy recipe to throw together, and a great treat to have on hand around the holidays.

Thanks to Kaitlin of Kait's Plate for this week's selection, please visit her blog for the recipe. Check out all the other SMSers toffee here.


Saturday, November 14, 2009

Thomas Keller's Chocolate Chip Cookies


It is no secret that I love chocolate chip cookies. If you're not aware of this fact about me, read this. And this. I know I said that I had found the perfect chocolate chip cookie and didn't feel the need to try any new recipes, but here I went and tried a new recipe. After hearing rave reviews from Wendy via Twitter, I had to.

The recipe comes from Ad Hoc at Home, the new Thomas Keller book. The main things that stand out in it are the large quantity of brown sugar, and the absence of vanilla. It isn't nearly as fussy as the NYT recipe; no combination of flours, no 24 hour rest, though it does call for sifting the chocolate after you've chopped it to give a cleaner look to the baked cookie. This is a step that I was torn about, as it means losing a substantial amount of chocolate in your final product. In the end I just used my hands, keeping more chocolate than I would have with a mesh sieve. I actually happen to like the look of the chocolate shards, so if I made this recipe again, I probably wouldn't bother with the sifting.


These cookies turned out much thinner than I prefer, and I had to bake them for 16 minutes versus the 12 minutes in the recipe. Any less time, and the centers of the cookies were so gooey, I couldn't even lift them off the baking sheet.

I wasn't wowed by these cookies right off the bat - when they were warm out of the oven, they really didn't do anything for me at all. However, as the cookies cool, the flavors develop and there is a complexity to them. I had no trouble eating 5 in an afternoon. The texture is extremely chewy around the edges, which I enjoyed, though I really couldn't get past the thinness of the cookie. I don't like them terribly thick or cakey at all, but I do like them to have a little more substance than these had. Even an overnight stint in the fridge didn't improve the height of the cookies. They were also quite greasy when they came out of the oven. I set each cookie on a paper towel, and it left behind a solid circle of grease.

My favorite chocolate chip cookie is still the NYT version. Though these were quite delicious, they weren't perfection, so I'm not sure I'll be making them again... They caused an existential crisis in Wendy, though, so don't take my word for it try them for yourself!


Chocolate Chip Cookies
from Ad Hoc at Home by Thomas Keller

2 1/3 cups + 1 tablespoon flour
3/4 teaspoon baking soda
1 teaspoon kosher salt
5 oz 55% chocolate, cut into chip-sized pieces (about 1 1/4 cups)
5 oz 70%-72% chocolate, cut into chip-sized pieces (about 1 1/4 cups)
1/2 pound (2 sticks) unsalted butter, cut into small pieces
1 cup packed dark brown sugar, preferably molasses sugar
3/4 cup granulated sugar
2 large eggs

1. Position the oven racks in the lower and upper thirds of the oven and heat the oven to 350 degrees. Line two baking sheets with Silpats or parchment paper.

2. Sift the flour and baking soda into a medium bowl. Stir in the salt.

3. Put the chips in a fine-mesh basket strainer and shake to remove any chocolate "dust" (small fragments).

4. In the bowl of a stand mixer fitted with the paddle attachment, beat half the butter on medium speed until fairly smooth. Add both sugars and the remaining butter, and beat until well combined, then beat for a few minutes, until the mixture is light and creamy. Scrape down the sides of the bowl. Add the eggs one at a time, beating until the first one is incorporated before adding the next and scraping the bowl as necessary. Add the dry ingredients and mix on low speed to combine. Mix in the chocolate.

5. Remove the bowl from the mixer and fold the dough with a spatula to be sure that the chocolate is evenly incorporated. The dough or shaped cookies can be refrigerated, well wrapped, for up to 5 days or frozen for up to 2 weeks. Freeze shaped cookies on the baking sheets until firm, then transfer to freezer containers. (Defrost frozen cookies overnight in the refrigerator before baking.)

6. Using about 2 level tablespoons per cookie, shape the dough into balls. Arrange 8 cookies on each pan, leaving about 2 inches between them, because the dough will spread. Bake for 12 minutes, or until the tops are no longer shiny, switching the position and rotating the pans halfway through the baking.

7. Cool the cookies on the pans on cooling racks for about 2 minutes to firm up a bit, then transfer to the racks to cool completely. Repeat to bake the remaining cookies. (The cookies can be stored in an airtight container for up to 2 days.)


Thursday, November 12, 2009

Secret Baker Round-Up


As you may know if you read this blog, or Tracey's, or Margaret's, the three of us came up with an idea on Twitter one night. We thought, since we do so much reading about things each other make, it would be fun to get to taste something. We decided to call it Secret Baker, like Secret Santa but with baked goods. So fun!

We all made announcements on our respective blogs, and had 20 people sign up!

I used random.org to pick out bakees for everyone, we picked a shipping date and we were off! I asked everyone to send me pictures of the goodies they got, and while not everyone has obliged, here are the pictures I have gotten. If anyone is reading this who hasn't sent me a pic, send it to me and I'll add it to this post.

First up are the goodies I made for Tracey! I couldn't believe I got her to bake for, especially because she was the winner of the giveaway I did a couple of months ago... I was so excited, because she was in on the creation of Secret Baker, so I went all out in baking for her. In addition to the macaroons above, here is what I sent:


Here are some chocolate-dipped peanut butter cookies that were sent to Kara from Lisa... Not sure if they have blogs, maybe they could let me know so I can link them?


These are the delicious Double Ginger Cookies that I received from Di! They were so yummy, I ate 5 within 45 seconds of opening the box... They have crystallized ginger in them - I loooove crystallized ginger - and I will definitely be trying out the recipe! Thanks Di!


Next up, we have Whole Grain Cranberry bread that Beth received from Wendy


Margot went all out, and baked 5 goodies for her bakee Helga (blogger?)! They were: Ginger Oatmeal Cookies, Cranberry Apple Cookies, Caramel Corn, Peanut and Pumpkin Seed Brittle with Pumpkin Pie Spice and Cinnamon Toast Biscotti. Wow Margot, you really outdid yourself!


Some more of Margot's goodies


Mary Ann got these Pumpkin Bars with Cinnamon & White Chocolate Chips From Tessa (blogger?) - so cute in the pumpkin shaped pan!


Di received these Peanut Butter & Jelly Bars from Leslie


Kayte received a lovely loaf of Cranberry Bread from Tracey, {I made my own version of the Cranberry Bread after seeing this picture, here is my post on it} as well as some Spiced Biscotti


I was sent this photo from Ashley, who actually baked these goodies for Margot, though there was no info in the email as to what everything is... Those cookies on the top left look like they could be World Peace Cookies, but I don't know... If Margot or Ashley reads this, let me know and I'll update...


Susan sent me this photo of some Cappuccino Biscotti that she baked for Nina


Wendy was sent S'Mores Bars by Whitney


Lastly, here are some spiced shortbread with pumpkin drizzle baked for Tessa (blogger?) by Kerri

Thanks so much for everyone who took part in the first round of Secret Baker! I had lots of fun and I hope all of you did too!

Feel free to send feedback to me (through email) about your experience and anything we can do to make Secret Baker better/easier/clearer, etc...

If you want to get in on the fun and receive something baked just for you, the second round of Secret Baker is now open! Margaret will be hosting, and it will be a Christmas/holiday cookie exchange. You can sign up by emailing me (blueridgebaker@gmail.com), Margaret or Tracey. If you took part in this round, all we need to know is that you are interested. If you are new to Secret Baker, please include your full name, shipping address, email, blog (if applicable), and any food allergies or aversions.

Thanks again everyone!

Related Posts with Thumbnails

ShareThis